<?xml version="1.0" encoding="utf-8"?><feed xmlns="http://www.w3.org/2005/Atom" ><generator uri="https://jekyllrb.com/" version="4.4.1">Jekyll</generator><link href="https://blogs.asarkar.com/feed.xml" rel="self" type="application/atom+xml" /><link href="https://blogs.asarkar.com/" rel="alternate" type="text/html" /><updated>2026-02-07T06:51:27+00:00</updated><id>https://blogs.asarkar.com/feed.xml</id><title type="html">Non Compos Mentis</title><subtitle>thoughts().random()</subtitle><author><name>Abhijit Sarkar</name><email>contact@asarkar.com</email></author><entry><title type="html">Signing Artifacts for Publishing to Maven Central Repository</title><link href="https://blogs.asarkar.com/technical/pgp-signature/" rel="alternate" type="text/html" title="Signing Artifacts for Publishing to Maven Central Repository" /><published>2025-05-10T00:00:00+00:00</published><updated>2025-05-10T00:00:00+00:00</updated><id>https://blogs.asarkar.com/technical/pgp-signature</id><content type="html" xml:base="https://blogs.asarkar.com/technical/pgp-signature/"><![CDATA[<h2 id="introduction">Introduction</h2>

<p>If you are the author or maintainer of an JVM-based Open Source software, chances are you publish it to the Maven Central repository so that automated build tools can download it. With <a href="https://jfrog.com/blog/into-the-sunset-bintray-jcenter-gocenter-and-chartcenter/">JCenter and Bintray decommissioned</a>, there’re not many hosting options around. There’s <a href="https://jitpack.io/">jitpack.io</a>, and it’s much easier to publish there than to Maven Central, but their relaxed requirements can also be seen as a problem. For example, JitPack builds from source, so, the artifacts aren’t signed. I publish to JitPack for hobby projects, but for serious work, I prefer Maven Central.</p>

<h2 id="problem-statement">Problem Statement</h2>

<p>Artifacts to be published to Maven Central must meet certain <a href="https://central.sonatype.org/publish/requirements/">requirements</a>, one of which is accompanying PGP signatures. Users of your library might want to verify these artifacts’ PGP signatures against a public key server. Several plugins are available for popular build tools like Maven, Gradle and SBT that attempt to make the publishing process less painful, but the signing process is a real pain in the neck. In this article, I will lay out the exact steps needed for generating a PGP key pair, and a Gradle example of using them to sign the artifacts. Having generated the keys, they can be used by any build tool.</p>

<p>A PGP signature can also be used for signing commits and tags on GitHub.</p>

<h2 id="security-considerations">Security Considerations</h2>
<p>Using a private key in a CI/CD enviornment like GitHub workflow requires <strong>extreme caution</strong> to avoid unintentional exposure. Here are a few best practices:</p>

<ul>
  <li>
    <p><strong>Key Cleanup:</strong> Always delete the imported key at the end of the job, regardless of the job outcome, to prevent accidental leaks.</p>
  </li>
  <li>
    <p><strong>Log Hygiene:</strong> Ensure that the key is never printed to the job logs, as this can expose it. If using GitHub Secrets, this is automatically taken care of by GitHub; you can also mask it yourself using the <a href="https://docs.github.com/en/actions/writing-workflows/choosing-what-your-workflow-does/workflow-commands-for-github-actions#masking-a-value-in-a-log">add-mask</a> workflow command.</p>
  </li>
  <li>
    <p><strong>Temporary Files:</strong> If your workflow uses temporary files to handle keys, make sure they are securely deleted.</p>
  </li>
</ul>

<h2 id="requirements">Requirements</h2>

<p>The only thing you will need other than a computer and an internet connection is Docker engine installed. For Windows and Mac, you can install <a href="https://www.docker.com/products/docker-desktop">Docker Desktop</a>.</p>

<h2 id="steps">Steps</h2>

<ol>
  <li>Run an Ubuntu container.
    <div class="language-plaintext highlighter-rouge"><div class="highlight"><pre class="highlight"><code>docker run --rm -it -v $(pwd)/.gnupg:/root/.gnupg -e GPG_TTY=/dev/console ubuntu bash
</code></pre></div>    </div>
  </li>
  <li>Install GnuPG, which is an implementation of the Open PGP standard.
    <div class="language-plaintext highlighter-rouge"><div class="highlight"><pre class="highlight"><code>apt update &amp;&amp; apt install -y gnupg
</code></pre></div>    </div>
  </li>
  <li>Generate a GPG key pair. Because of the Docker volume mapping, the generated keys are stored in the <code class="language-plaintext highlighter-rouge">.gnupg</code> directory in your home directory.
    <div class="language-plaintext highlighter-rouge"><div class="highlight"><pre class="highlight"><code>gpg --full-generate-key
</code></pre></div>    </div>
  </li>
  <li>At the prompt, specify the kind of key you want, or press Enter to accept the default RSA and RSA.</li>
  <li>Enter the desired key size. I recommend at least 4096 bits.</li>
  <li>Enter the length of time the key should be valid. Press Enter to accept the default selection, indicating that the key does not expire.</li>
  <li>Confirm that the key does not expire by entering ‘y’.</li>
  <li>Enter your full name.</li>
  <li>Enter your email address.</li>
  <li>Enter a comment, or press Enter to skip.</li>
  <li>Verify that your selections are correct. Enter ‘O’ (Upper case O) to proceed.</li>
  <li>Type a secure passphrase. If you enter a weak passphrase, you will be asked to confirm it.</li>
  <li>Retype the passphrase.</li>
  <li>Use the following command to list GPG keys for which you have both a public and private key.
    <div class="language-plaintext highlighter-rouge"><div class="highlight"><pre class="highlight"><code>gpg --list-secret-keys --keyid-format SHORT
</code></pre></div>    </div>
    <p>The last few lines will be similar to the following. The key id/fingerprint is the 40-character string on the second line of <code class="language-plaintext highlighter-rouge">sec</code>. The last 8 characters (shown on the first line after <code class="language-plaintext highlighter-rouge">rsa3072</code>, <code class="language-plaintext highlighter-rouge">9D397642</code> in the example below) are sufficient to uniquely identify the key, and is referred to as the <code class="language-plaintext highlighter-rouge">&lt;key id&gt;</code> in the following steps.</p>
    <div class="language-plaintext highlighter-rouge"><div class="highlight"><pre class="highlight"><code>sec   rsa3072/9D397642 2021-04-04 [SC]
  C49D1269413357A989292F0BBED9F87D9D397642
uid         [ultimate] John Doe &lt;johndoe@nowhere.com&gt;
ssb   rsa3072/AD77D767 2021-04-04 [E]
</code></pre></div>    </div>
    <p>To list the public keys in the keyring, run with <code class="language-plaintext highlighter-rouge">--list-keys</code> instead of <code class="language-plaintext highlighter-rouge">--list-secret-keys</code>. Note that the key id is the same for both.
If you need to retrive the public key later, you can search for it using the key id or the email provided in step 9 above.</p>
    <div class="language-plaintext highlighter-rouge"><div class="highlight"><pre class="highlight"><code>gpg --keyserver &lt;keyserver&gt; --search-key &lt;key id&gt;
gpg --auto-key-locate &lt;keyserver&gt; --locate-keys &lt;email&gt;
</code></pre></div>    </div>
    <p>The keyserver must include the protocol <code class="language-plaintext highlighter-rouge">hkp</code>.</p>
  </li>
  <li>Upload the public key to a key server; Maven Central uses hkp://keyserver.ubuntu.com.
    <div class="language-plaintext highlighter-rouge"><div class="highlight"><pre class="highlight"><code>gpg --keyserver keyserver.ubuntu.com --send-keys &lt;key id&gt;
</code></pre></div>    </div>

    <p>Optionally, convert the secret key to a Base64 encoded format with no line breaks. This may be required because a lot of public CI servers allow the secret key to be set as an environment variable, and the line breaks and special characters in the secret key are not compatible with an environment variable.</p>
    <div class="language-plaintext highlighter-rouge"><div class="highlight"><pre class="highlight"><code>gpg --armor --export-secret-keys &lt;key id&gt; | base64 -w0
</code></pre></div>    </div>

    <p>If you are using Gradle, you can use the <a href="https://docs.gradle.org/current/userguide/signing_plugin.html">Signing plugin</a> along with the Base64 keys to sign the artifacts, as shown below (using Kotlin DSL):</p>

    <div class="language-plaintext highlighter-rouge"><div class="highlight"><pre class="highlight"><code>fun base64Decode(prop: String): String? {
    return project.findProperty(prop)?.let {
        String(Base64.getDecoder().decode(it.toString())).trim()
    }
}

signing {
    useInMemoryPgpKeys(base64Decode("signingKey"), base64Decode("signingPassword"))
    sign(*publishing.publications.toTypedArray())
}
</code></pre></div>    </div>
    <p><code class="language-plaintext highlighter-rouge">signingKey</code> and <code class="language-plaintext highlighter-rouge">signingPassword</code> are project properties that are set from the corresponding environment properties.</p>

    <p>If you’ve previously saved the keys to files, here are the commands to import them.</p>
    <div class="language-plaintext highlighter-rouge"><div class="highlight"><pre class="highlight"><code>gpg --import &lt;/path/to/public/key/file&gt;
gpg --allow-secret-key-import --import &lt;/path/to/private/key/file&gt;
</code></pre></div>    </div>
  </li>
  <li>As for the actual upload to Maven Central, the Gradle Maven Publish Plugin doesn’t support publishing to the new Sonatype Central Publishing Portal. There’s an <a href="https://github.com/gradle/gradle/issues/28120">open issue</a> for Gradle to support publishing to Central, but they seem to be reluctant in doing so. There’re a bunch of <a href="https://central.sonatype.org/publish/publish-portal-gradle/#alternatives">third-party plugins</a> that support publishing to Central, among which <code class="language-plaintext highlighter-rouge">JReleaser</code> and <code class="language-plaintext highlighter-rouge">vanniktech/gradle-maven-publish-plugin</code> seem to be the most popular and actively maintained. I personally couldn’t get JReleaser to sign the artifacts successfully, and went with the vanniktech plugin instead.</li>
</ol>

<h2 id="conclusion">Conclusion</h2>

<p>And there we have it, a complete recipe for generating a PGP key pair, and a Gradle example of using them to sign the artifacts.</p>]]></content><author><name>Abhijit Sarkar</name><email>contact@asarkar.com</email></author><category term="Technical" /><category term="technical" /><category term="java" /><category term="build-automation" /><category term="pgp" /><category term="maven" /><category term="gradle" /><category term="ci-cd" /><summary type="html"><![CDATA[Signing Artifacts for Publishing to Maven Central Repository.]]></summary></entry><entry><title type="html">grPC Health Checks on Kubernetes with Spring Boot Actuator</title><link href="https://blogs.asarkar.com/technical/grpc-kubernetes-spring/" rel="alternate" type="text/html" title="grPC Health Checks on Kubernetes with Spring Boot Actuator" /><published>2020-09-27T00:00:00+00:00</published><updated>2020-09-27T00:00:00+00:00</updated><id>https://blogs.asarkar.com/technical/grpc-kubernetes-spring</id><content type="html" xml:base="https://blogs.asarkar.com/technical/grpc-kubernetes-spring/"><![CDATA[<h2 id="introduction">Introduction</h2>

<p>Over the last few years, we have seen more and more projects and companies adopt gRPC as the communication protocol among internal microservices, or even for customer-facing services. gRPC can be implemented in many languages, Java being one of them, and when it comes to Java web frameworks, Spring Boot is arguably the most popular. On the deployment side of things, Kubernetes has emerged as the undisputed leader. Thus, it is only fair that we talk about all three of them when we are looking to make a production-ready application.</p>

<p>From now on, I will refer to Spring Boot simply as <em>Boot</em>, and Kubernetes as <em>K8S</em>. Also, I will use “gRPC service” and “gRPC server” interchangeably unless there is a specific need for disambiguation.</p>

<p class="notice">I deliberately avoided providing supporting information about the popularity claims made above, but if you are the “trust but verify” type, feel free to convince yourself by doing some research.</p>

<h2 id="problem-statement">Problem Statement</h2>

<p>We want to deploy a gRPC client-server application in K8S with no web (HTTP/S) interface, and we want to monitor the application health.</p>

<h2 id="design">Design</h2>

<p>Let’s first take stock of where each member of the trio stands when it comes to monitoring application health:</p>

<ul>
  <li><strong>gRPC</strong> defines a <a href="https://github.com/grpc/grpc/blob/master/doc/health-checking.md">health checking protocol</a> for the server. It does not define a corresponding protocol for the client.</li>
  <li><strong>K8S</strong> defines <a href="https://kubernetes.io/docs/tasks/configure-pod-container/configure-liveness-readiness-startup-probes/">liveness and readiness probes</a>.</li>
  <li><strong>Boot</strong> provides Actuator, and Actuator provides a <a href="https://docs.spring.io/spring-boot/docs/current/reference/html/production-ready-features.html#production-ready-health">Health endpoint</a>.</li>
</ul>

<p>So, a reasonable strategy is to implement the gRPC health checking protocol, make it available under the Boot Actuator health endpoint, and then use the K8S probes to query the Actuator health endpoint time to time.</p>

<h2 id="implementation">Implementation</h2>

<h3 id="grpc">gRPC</h3>

<p>Good thing is, <code class="language-plaintext highlighter-rouge">io.grpc:grpc-services</code> comes with an implementation of the <code class="language-plaintext highlighter-rouge">Health</code> service that implements the “GRPC Health Checking Protocol”; it is the class <a href="https://github.com/grpc/grpc-java/blob/master/services/src/main/java/io/grpc/services/HealthServiceImpl.java">HealthServiceImpl</a> and can be retrieved by a call to <a href="https://grpc.github.io/grpc-java/javadoc/io/grpc/services/HealthStatusManager.html#getHealthService--">HealthStatusManager.getHealthService()</a>. However, registering that service with the gRPC server is our responsibility.</p>

<p>For monitoring a gRPC client readiness, we can watch the <code class="language-plaintext highlighter-rouge">ManagedChannel</code> state using the methods <a href="https://grpc.github.io/grpc-java/javadoc/io/grpc/ManagedChannel.html#getState-boolean-">ManagedChannel.getState()</a> and <a href="https://grpc.github.io/grpc-java/javadoc/io/grpc/ManagedChannel.html#notifyWhenStateChanged-io.grpc.ConnectivityState-java.lang.Runnable-">ManagedChannel.notifyWhenStateChanged()</a> methods. If the state is <a href="https://grpc.github.io/grpc-java/javadoc/io/grpc/ConnectivityState.html#TRANSIENT_FAILURE">ConnectivityState.TRANSIENT_FAILURE</a> when checked, there has been some transient failure, and the gRPC client app is alive but not accepting requests (not ready).</p>

<p>Implementing a gRPC client liveness check is up to the application.</p>

<h3 id="boot">Boot</h3>

<p>As of this writing, Spring Boot does not have out of the box support for gRPC (little surprising, since they seem to support everything else under the sun). A Google search brings up two libraries that aim to fill this gap, <a href="https://github.com/yidongnan/grpc-spring-boot-starter">yidongnan/grpc-spring-boot-starter</a> being one of them. If property <code class="language-plaintext highlighter-rouge">grpc.server.health-service-enabled</code> is <code class="language-plaintext highlighter-rouge">true</code> (default), it registers the <code class="language-plaintext highlighter-rouge">Health</code> service automatically for us. So, in order to make the server health status available under Actuator health endpoint, we just need to implement a <a href="https://docs.spring.io/spring-boot/docs/current/api/org/springframework/boot/actuate/health/HealthIndicator.html">HealthIndicator</a> named <code class="language-plaintext highlighter-rouge">GrpcServerHealthIndicator</code> that is a client of the <code class="language-plaintext highlighter-rouge">Health</code> service. See <a href="https://docs.spring.io/spring-boot/docs/2.2.x/reference/html/production-ready-features.html#writing-custom-healthindicators">Writing Custom HealthIndicators</a>.</p>

<p>Starting with version <code class="language-plaintext highlighter-rouge">2.3.0.RELEASE</code>, Spring Boot provides liveness and readiness information under Actuator health endpoint. See <a href="https://docs.spring.io/spring-boot/docs/current/reference/html/production-ready-features.html#production-ready-kubernetes-probes">Kubernetes Probes</a> for details. In order to include our <code class="language-plaintext highlighter-rouge">GrpcServerHealthIndicator</code> in liveness and readiness groups, see <a href="https://docs.spring.io/spring-boot/docs/current/reference/htmlsingle/#production-ready-kubernetes-probes-external-state">Checking external state with Kubernetes Probes</a>.</p>

<p>For example, to add to the <code class="language-plaintext highlighter-rouge">readiness</code> health group:</p>
<div class="language-plaintext highlighter-rouge"><div class="highlight"><pre class="highlight"><code>management.endpoint.health.group.readiness.include=readinessState,grpcServer
</code></pre></div></div>

<p>A Boot application running on Kubernetes will show the following health report:</p>

<div class="language-plaintext highlighter-rouge"><div class="highlight"><pre class="highlight"><code>/actuator/health

{
  "status": "UP",
  "components": {
    "diskSpace": {
      "status": "UP",
      "details": { //...
      }
    },
    "livenessProbe": {
      "status": "UP"
    },
    "ping": {
      "status": "UP"
    },
    "readinessProbe": {
      "status": "UP"
    }
  },
  "groups": [
    "liveness",
    "readiness"
  ]
}
</code></pre></div></div>
<p>and</p>

<div class="language-plaintext highlighter-rouge"><div class="highlight"><pre class="highlight"><code>/actuator/health/liveness

{
  "status": "UP",
  "components": {
    "livenessProbe": {
      "status": "UP"
    }
  }
}
</code></pre></div></div>

<p>The problem, though, is that our application does not have any web interface. So, what do we do?</p>

<p class="notice">Pretend you are thinking hard about a solution before reading on.</p>

<p>The solution is to use <a href="https://docs.spring.io/spring-boot/docs/current/reference/html/production-ready-features.html#production-ready-jmx">Actuator monitoring over JMX</a>.</p>

<p>Following is the JMX counterpart to the HTTP <code class="language-plaintext highlighter-rouge">/actuator/health</code> output above (line breaks and indentation for legibility only):</p>
<div class="language-plaintext highlighter-rouge"><div class="highlight"><pre class="highlight"><code>{
  status=UP,
  components={
    diskSpace={status=UP, details={...}},
    livenessState={status=UP},
    ping={status=UP},
    readinessState={status=UP}
  },
  groups=[liveness, readiness]
}
</code></pre></div></div>

<p>Note that the K8S probes are not mandatory, so, if you are using an older version of Boot that does not support those, fret not. The <code class="language-plaintext highlighter-rouge">GrpcServerHealthIndicator</code> can still contribute to the overall health status available in the top-level <code class="language-plaintext highlighter-rouge">status</code>, it just will not contribute to the <code class="language-plaintext highlighter-rouge">liveness</code> and <code class="language-plaintext highlighter-rouge">readiness</code> health groups.</p>

<h3 id="k8s">K8S</h3>

<p>K8S defines two distinct checks: Liveness and readiness. However, gRPC only defines a single health checking protocol and does not have a native concept of readiness check. A reasonable way to map gRPC responses to Kubernetes checks way is interpreting <code class="language-plaintext highlighter-rouge">SERVING</code> response as the service being alive and ready to accept more requests, <code class="language-plaintext highlighter-rouge">NOT SERVING</code> response as the service being alive but not accepting requests, and <code class="language-plaintext highlighter-rouge">UNKNOWN</code> or failure to respond as the service not being alive.</p>

<p>We have already discussed mapping gRPC client health to Kubernetes checks in <a href="/technical/grpc-kubernetes-spring/#grpc">this</a> section.</p>

<h3 id="jmx">JMX</h3>

<p>To monitor a JVM using the JMX API, we must enable the JMX agent when starting the JVM. We can enable the JMX agent for local monitoring, for a client management application running on the local system, or for remote monitoring, for a client management application running on a remote system. The steps involved vary, and can be quite involved. See <a href="https://docs.oracle.com/en/java/javase/11/management/monitoring-and-management-using-jmx-technology.html">Monitoring and Management Using JMX Technology
</a> for details. Apparently it is not very well understood, as indicated by the plethora of Stack Overflow questions on this topic:</p>

<ul>
  <li><a href="https://stackoverflow.com/q/56337983/839733">How to programmatically invoke MBeans operation of target process</a>.</li>
  <li><a href="https://stackoverflow.com/q/50392589/839733">spring boot actuator connect jmx programmatically</a>.</li>
  <li><a href="https://stackoverflow.com/q/56105364/839733">How to use SpringBoot actuator over JMX</a>.</li>
  <li><a href="https://stackoverflow.com/q/5552960/839733">How to connect to a java program on localhost jvm using JMX?</a></li>
  <li><a href="https://stackoverflow.com/q/29412072/839733">How to access Spring-boot JMX remotely</a>.</li>
</ul>

<p>For the problem at hand, we will use a much simpler approach. Note that the K8S probes execute on the same host as the application, so we do not need to connect to the app remotely. Instead, we will find the process we want to attach to, just like we do when running <code class="language-plaintext highlighter-rouge">JConsole</code>, using the <a href="https://docs.oracle.com/en/java/javase/11/tools/jcmd.html#GUID-59153599-875E-447D-8D98-0078A5778F05">jcmd</a> tool introduced in Java SE 7. It is available under <code class="language-plaintext highlighter-rouge">$JAVA_HOME/bin</code>, same place as the <code class="language-plaintext highlighter-rouge">java</code> binary.</p>

<p>Assuming we have started our gRPC app using the following command:</p>

<div class="language-plaintext highlighter-rouge"><div class="highlight"><pre class="highlight"><code>java -cp /myapp.jar com.mycompany.myapp.MainClass
</code></pre></div></div>

<p>The output of running <code class="language-plaintext highlighter-rouge">jcmd</code> will show (with different PIDs) the following:</p>

<div class="language-plaintext highlighter-rouge"><div class="highlight"><pre class="highlight"><code>87864 jdk.jcmd/sun.tools.jcmd.JCmd
87785 com.mycompany.myapp.MainClass
</code></pre></div></div>

<p>We use the <a href="https://docs.oracle.com/en/java/javase/11/docs/api/java.base/java/lang/ProcessBuilder.html">ProcessBuilder</a> class to run the <code class="language-plaintext highlighter-rouge">jcmd</code> command. We then parse the output as shown above and find the PID for the JVM process matching the given main class name. Following is a Kotlin code snippet showing how to do it:</p>

<div class="language-plaintext highlighter-rouge"><div class="highlight"><pre class="highlight"><code>val pid = output
  .map { it.split("\\s+".toRegex()) }
  .filter { it.size &gt; 1 &amp;&amp; it[1].endsWith(mainClass) }
  .map { it.first() }
  .firstOrNull() ?: throw IllegalArgumentException("Couldn't find process matching: $mainClass")
</code></pre></div></div>

<p>That is all we need to attach to that process using the <a href="https://www.infoworld.com/article/2073919/groovy--jmx--and-the-attach-api.html">Attach API</a> that was introduced in Java SE 6.
Our JMX client attaches to the <a href="https://docs.oracle.com/en/java/javase/11/docs/api/jdk.attach/com/sun/tools/attach/VirtualMachine.html">VirtualMachine</a> corresponding to the PID, and starts the JMX management agent in the target process if not already running. Kotlin code snippet again:</p>

<div class="language-plaintext highlighter-rouge"><div class="highlight"><pre class="highlight"><code>val connectorAddress = vm.agentProperties.getProperty("com.sun.management.jmxremote.localConnectorAddress") ?: vm.startLocalManagementAgent()
val url = JMXServiceURL(connectorAddress)
val connection = JMXConnectorFactory.connect(url).mBeanServerConnection
</code></pre></div></div>

<p>It then invokes the <code class="language-plaintext highlighter-rouge">health</code> operation on the Spring Boot <code class="language-plaintext highlighter-rouge">Health</code> <code class="language-plaintext highlighter-rouge">MBean</code>.</p>

<div class="language-plaintext highlighter-rouge"><div class="highlight"><pre class="highlight"><code>val health = connection
  .invoke("org.springframework.boot:type=Endpoint,name=Health", "health", null, null)
  .toString()
</code></pre></div></div>

<p>Finally, it parses the result, and checks the status of the <code class="language-plaintext highlighter-rouge">livenessState</code> or <code class="language-plaintext highlighter-rouge">readinessState</code>. If Kubernetes probes are not available/enabled, it checks the top-level <code class="language-plaintext highlighter-rouge">status</code>. If the status is not <code class="language-plaintext highlighter-rouge">UP</code>, it throws an exception causing the client to exit with an error. The parsing logic can be implemented in various ways, and I leave it to the reader to choose their own.</p>

<p>Assuming the JMX client is a command line app that accepts option <code class="language-plaintext highlighter-rouge">-m</code> for the main class, and options <code class="language-plaintext highlighter-rouge">-l</code> and <code class="language-plaintext highlighter-rouge">-r</code> for running the liveness and readiness checks, respectively, we can set up the K8S liveness probe as follows:</p>

<div class="language-plaintext highlighter-rouge"><div class="highlight"><pre class="highlight"><code>livenessProbe:
  exec:
    command:
    - health-probe
    - -l
    - -m
    - MainClass
  initialDelaySeconds: 5
  periodSeconds: 5
</code></pre></div></div>

<p>The readiness probe is almost identical.</p>

<p>We assume above that <code class="language-plaintext highlighter-rouge">health-probe</code> is a binary executable available on the server <code class="language-plaintext highlighter-rouge">PATH</code>. There are various ways to distribute a Java app with binaries that we will not discuss here; if using Gradle as a build tool, the <a href="https://docs.gradle.org/current/userguide/application_plugin.html">Application plugin</a> can do it.</p>

<p class="notice--info">Obviously, the JMX client distribution has to be included in the server Docker image for the K8S probes to work.</p>

<h2 id="conclusion">Conclusion</h2>

<p>And there we have it, a complete recipe for grPC health checks on Kubernetes with Spring Boot Actuator.</p>]]></content><author><name>Abhijit Sarkar</name><email>contact@asarkar.com</email></author><category term="Technical" /><category term="technical" /><category term="kubernetes" /><category term="grpc" /><category term="spring" /><category term="java" /><summary type="html"><![CDATA[grPC Health Checks on Kubernetes with Spring Boot Actuator.]]></summary></entry><entry><title type="html">Task Scheduling</title><link href="https://blogs.asarkar.com/technical/task-scheduling/" rel="alternate" type="text/html" title="Task Scheduling" /><published>2018-06-08T00:00:00+00:00</published><updated>2018-06-08T00:00:00+00:00</updated><id>https://blogs.asarkar.com/technical/task-scheduling</id><content type="html" xml:base="https://blogs.asarkar.com/technical/task-scheduling/"><![CDATA[<h2 id="introduction">Introduction</h2>

<p>I recently came across <a href="http://exceptional-code.blogspot.com/2018/01/writing-scheduler-for-tasks-with-dag.html">this</a>
blog post where the author talks about a solution for scheduling interdependent
tasks. Coincidentally, I have been brushing up Data Structures and Algorithms
in preparation for job interviews and realized that the solution discussed in
the aforementioned blog could be simplified. That is what I am going to be
discussing in this post.</p>

<h2 id="problem-statement">Problem Statement</h2>

<p>Given a set of tasks that have dependencies on one another, find an execution
order such that depended tasks are executed before their dependents. This is a
general class of problems known as the <em>Scheduling Problems</em> that honors a set
of constraints, most importantly, the <em>precedence constraints</em>, which specify
that certain tasks must be performed before certain others.
For example, consider a college student planning a course schedule, under the
constraint that certain courses are prerequisite for certain other courses.
In the image below, an arrow from course A to course B means A needs to be taken before B.</p>

<figure class=""><img src="/assets/images/scheduling.png" alt="Scheduling Problem" /></figure>

<p>
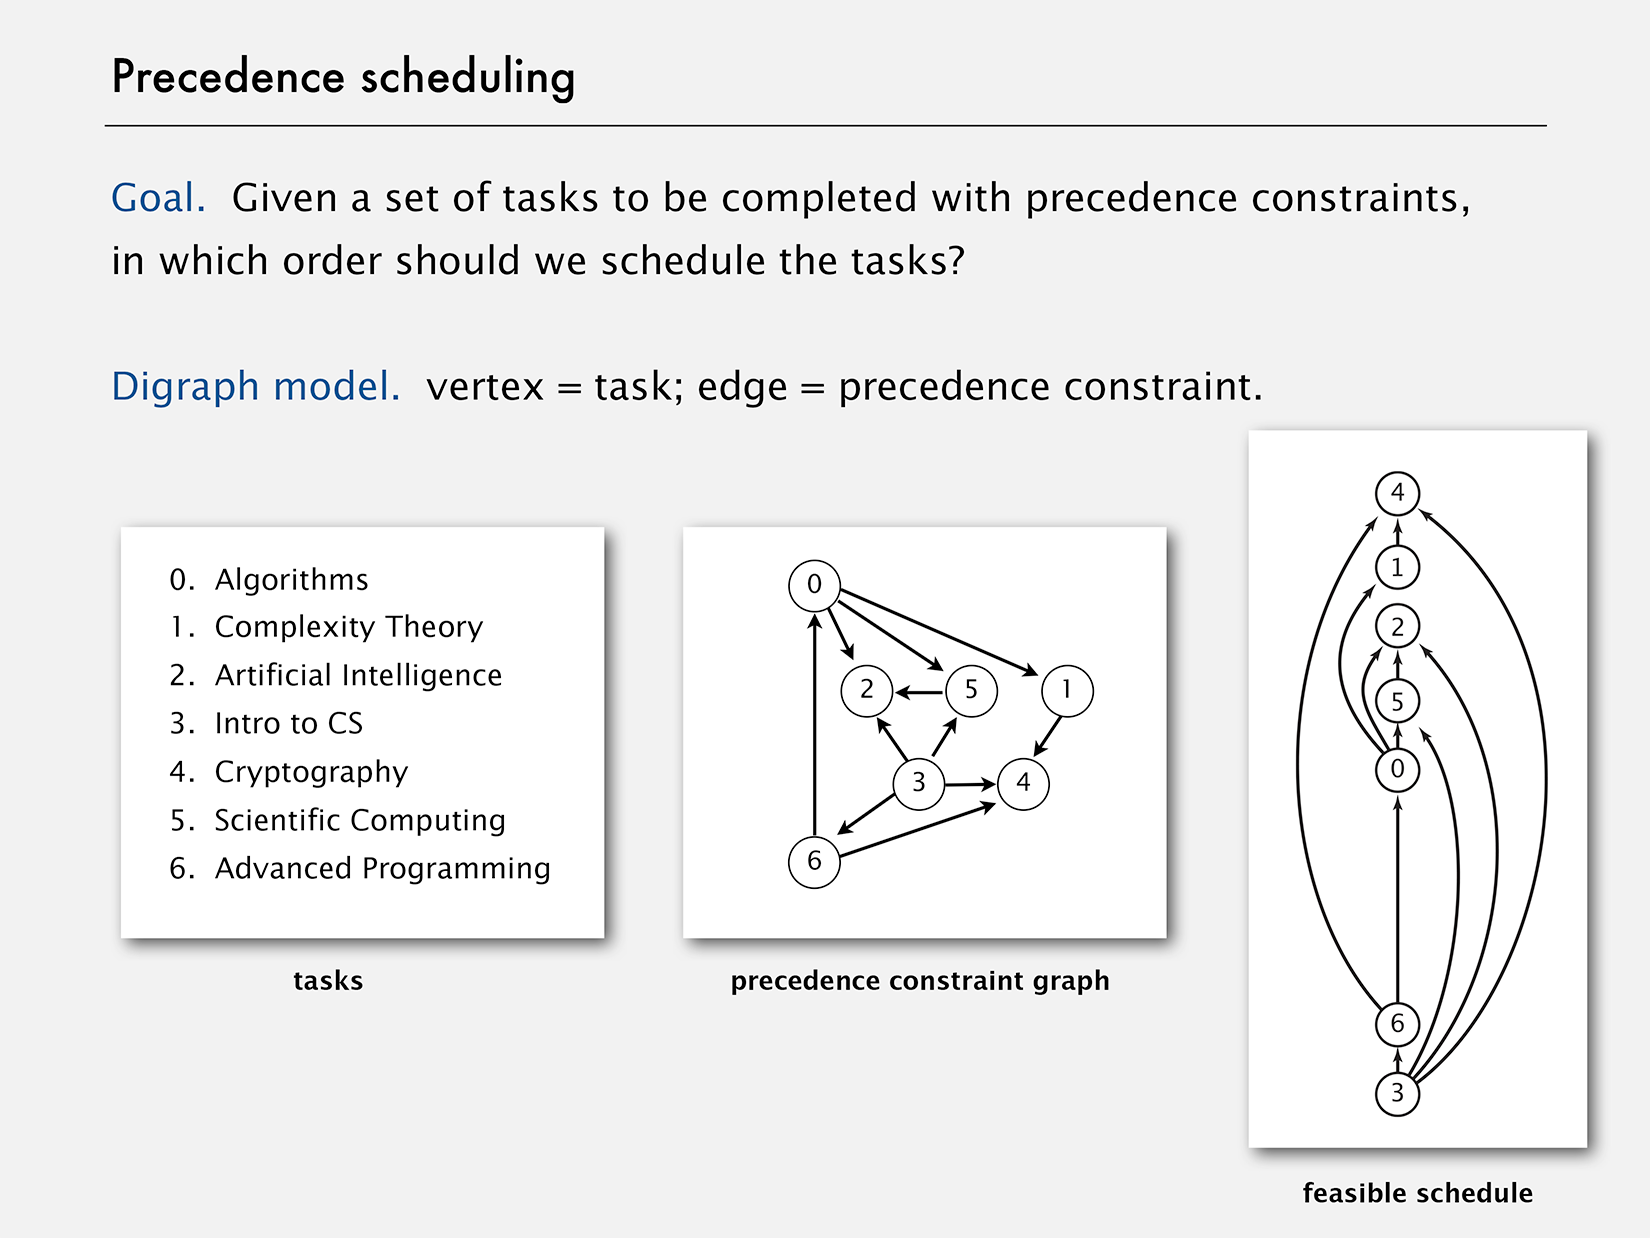
This problem can be solved by sorting the directed graph in the <a href="https://en.wikipedia.org/wiki/Topological_sorting">Topological order</a>
such that all its edges point from a vertex earlier in the order to a
vertex later in the order. A topological order for our example model is shown above.</p>

<p class="notice">An obvious prerequisite is that no cycles exist in the graph. Our solution is
going to check for cycles though (<a href="https://en.wikipedia.org/wiki/Trust,_but_verify">Trust, but verify</a>).</p>

<h2 id="design">Design</h2>

<p>It occurred to me that a Topological sort is actually not necessary,
because the dependencies of a task are fixed at its
construction time. The original solution needed the sort because the
task scheduler attempted to figure out which tasks needed to run before others;
instead, we can simplify the design such that each task notifies its dependents on its completion. Think of it like a Domino effect;
once started, the process would progress on its own. Referring to the previous
example, Scientific Computing would notify Artificial Intelligence when it is completed, Complexity Theory would notify Cryptography, and so on and so forth.</p>

<p>That is where the <a href="https://en.wikipedia.org/wiki/Observer_pattern">Observer Pattern</a> comes in.</p>

<h2 id="implementation">Implementation</h2>

<p class="notice">I make heavy use Java 8 Stream and concurrency constructs, so if you are not
familiar with those, you may want to brush up on those before reading further.</p>

<h3 id="task">Task</h3>

<p>Java supports the <em>Observer Pattern</em> in two ways:</p>

<ol>
  <li>
    <p>Using <code class="language-plaintext highlighter-rouge">Observer</code> and <code class="language-plaintext highlighter-rouge">Observable</code>.</p>
  </li>
  <li>
    <p>Using <code class="language-plaintext highlighter-rouge">PropertyChangeSupport</code> and <code class="language-plaintext highlighter-rouge">PropertyChangeListener</code>.</p>
  </li>
</ol>

<p>I chose the latter because the former has been deprecated in Java 9; see the
<code class="language-plaintext highlighter-rouge">Observable</code> <a href="https://docs.oracle.com/javase/9/docs/api/java/util/Observable.html">Javadoc</a> for details.</p>

<p>All we need to do in a task is keep track of the completion of its dependencies.
When all the tasks it depends on have completed, the task starts execution,
and on completion, notifies its dependents. Here’s the <code class="language-plaintext highlighter-rouge">Task</code> class
snippet:</p>

<div class="language-plaintext highlighter-rouge"><div class="highlight"><pre class="highlight"><code>public final class Task&lt;V&gt; implements PropertyChangeListener {
    private final String id;
    private final PropertyChangeSupport support;
    private final Collection&lt;Task&lt;V&gt;&gt; dependsOn;
    private final Function&lt;Map&lt;String, V&gt;, V&gt; action;
    private final Executor executor;
    private final Map&lt;String, V&gt; resultMap;

    private Task(...) {
        this.id = id;
        this.dependsOn = dependsOn;
        this.action = action;
        this.executor = executor;

        this.support = new PropertyChangeSupport(this);
        this.resultMap = new ConcurrentHashMap&lt;&gt;();
        this.dependsOn.forEach(d -&gt; d.addDependent(this));
    }

    public static &lt;T&gt; TaskBuilder&lt;T&gt; builder() {
        return new TaskBuilder&lt;&gt;();
    }

    @SuppressWarnings("unchecked")
    void addDependent(PropertyChangeListener dependent) {
        support.addPropertyChangeListener(dependent);
        if (dependent instanceof Task&lt;?&gt;) {
            Collection&lt;Task&lt;V&gt;&gt; dependsOn = ((Task&lt;V&gt;) dependent).dependsOn;
            if (!dependsOn.contains(this)) {
                dependsOn.add(this);
            }
        }
    }

    ...

    public V result() {
        return resultMap.get(id);
    }

    @Override
    @SuppressWarnings("unchecked")
    public void propertyChange(PropertyChangeEvent evt) {
        String taskId = evt.getPropertyName();
        Set&lt;String&gt; ids = dependsOn
                .stream()
                .map(task -&gt; task.id)
                .collect(toSet());

        if (!ids.contains(taskId)) {
            throw new IllegalStateException(...);
        }
        resultMap.put(taskId, (V) evt.getNewValue());
        if (ids.equals(resultMap.keySet())) {
            execute();
        }
    }

    public void execute() {
        try {
            CompletableFuture.supplyAsync(
                      () -&gt; action.apply(unmodifiableMap(resultMap)), executor)
                    .thenAccept(result -&gt; {
                        resultMap.put(id, result);
                        support.firePropertyChange(id, null, result);
                    });
        } catch (Exception e) {
            e.printStackTrace();
        }
    }

    ...

    public static final class TaskBuilder&lt;V&gt; {
        ...

        public Task&lt;V&gt; build() {
            ...
            return new Task&lt;&gt;(id, dependsOn, action, executor);
        }
    }
}
</code></pre></div></div>

<p>I use the <a href="https://en.wikipedia.org/wiki/Builder_pattern">Builder Pattern</a>
to provide an elegant means of constructing a task.</p>

<p>The task scheduler simply needs to check if there is a cycle, and if not, submit
the tasks that do not depend on others. In order to do that, I use the
excellent <a href="https://github.com/kevin-wayne/algs4">algs4</a> library.</p>

<div class="language-plaintext highlighter-rouge"><div class="highlight"><pre class="highlight"><code>public final class TaskScheduler&lt;V&gt; {
    private final Map&lt;String, V&gt; resultMap;
    private final CountDownLatch latch;
    private final List&lt;Task&lt;V&gt;&gt; rootTasks;
    ...

    @SuppressWarnings("unchecked")
    public TaskScheduler(List&lt;Task&lt;V&gt;&gt; tasks) {
        int v = tasks.size();
        Map&lt;String, Integer&gt; taskMap = IntStream.range(0, v)
                .mapToObj(i -&gt; new SimpleImmutableEntry&lt;&gt;(tasks.get(i).id(), i))
                .collect(toMap(Map.Entry::getKey, Map.Entry::getValue));

        Digraph graph = new Digraph(v);
        taskMap.forEach((name, idx) -&gt; {
            Task&lt;V&gt; task = tasks.get(idx);
            task.dependsOn()
                    .forEach(dependency -&gt;
                        graph.addEdge(idx, taskMap.get(dependency)));
        });
        DirectedCycle directedCycle = new DirectedCycle(graph);
        if (directedCycle.hasCycle()) {
            ...
            throw new IllegalArgumentException(...);
        }

        rootTasks = IntStream.range(0, v)
                .filter(i -&gt; graph.outdegree(i) == 0)
                .mapToObj(tasks::get)
                .collect(toList());

        resultMap = new ConcurrentHashMap&lt;&gt;();
        latch = new CountDownLatch(v);
        PropertyChangeListener accumulator = evt -&gt; {
            latch.countDown();
            resultMap.put(evt.getPropertyName(), (V) evt.getNewValue());
        };
        tasks.forEach(task -&gt; task.addDependent(accumulator));
    }

    public Map&lt;String, V&gt; await(long timeout, TimeUnit unit) {
        rootTasks.forEach(Task::execute);
        latch.await(timeout, unit);

        return unmodifiableMap(resultMap);
    }
}
</code></pre></div></div>

<p>Lastly, since we should never write code without writing unit tests (you do not, right?),
here is a test:</p>

<div class="language-plaintext highlighter-rouge"><div class="highlight"><pre class="highlight"><code>void testTask() throws InterruptedException {
    Random random = new Random();
    ExecutorService executor = Executors.newSingleThreadExecutor();

    Task&lt;Integer&gt; f1 = Task.&lt;Integer&gt;builder()
            .id("f1")
            .executor(executor)
            .action(resultMap -&gt; {
                try {
                    Thread.sleep(random.nextInt(5));
                } catch (InterruptedException e) {
                    e.printStackTrace();
                }
                return 0;
            })
            .build();
    Task&lt;Integer&gt; f2 = Task.&lt;Integer&gt;builder()
            .id("f2")
            .executor(executor)
            .action(resultMap -&gt; {
                try {
                    Thread.sleep(random.nextInt(5));
                } catch (InterruptedException e) {
                    e.printStackTrace();
                }
                return 1;
            })
            .build();
    Task&lt;Integer&gt; f3 = Task.&lt;Integer&gt;builder()
            .id("f3")
            .executor(executor)
            .dependsOn(Arrays.asList(f1, f2))
            .action(resultMap -&gt; {
                try {
                    Thread.sleep(random.nextInt(5));
                } catch (InterruptedException e) {
                    e.printStackTrace();
                }
                return resultMap.get("f1") + resultMap.get("f2");
            })
            .build();
    Task&lt;Integer&gt; f4 = Task.&lt;Integer&gt;builder()
            .id("f4")
            .executor(executor)
            .dependsOn(Arrays.asList(f2, f3))
            .action(resultMap -&gt; {
                try {
                    Thread.sleep(random.nextInt(5));
                } catch (InterruptedException e) {
                    e.printStackTrace();
                }
                return resultMap.get("f2") + resultMap.get("f3");
            })
            .build();

    Integer result = new TaskScheduler&lt;&gt;(f1, f2, f3, f4)
            .await(30, TimeUnit.SECONDS)
            .get("f4");

    assertNotNull(result);
    assertEquals(2, result.intValue());
}
</code></pre></div></div>

<p>To finish off, here is a sample execution log:</p>

<div class="language-plaintext highlighter-rouge"><div class="highlight"><pre class="highlight"><code>Task: f1 depends on: []
Task: f2 depends on: []
Task: f3 depends on: [f1, f2]
Task: f4 depends on: [f2, f3]
Task: f1 is executing on thread: pool-1-thread-1
Received notification from task: f1 inside task: f3
Task: f3 is not ready
Task: f2 is executing on thread: pool-1-thread-1
Received notification from task: f2 inside task: f3
Task: f3 is ready to be executed
Received notification from task: f2 inside task: f4
Task: f4 is not ready
Task: f3 is executing on thread: pool-1-thread-1
Received notification from task: f3 inside task: f4
Task: f4 is ready to be executed
Task: f4 is executing on thread: pool-1-thread-1
</code></pre></div></div>

<h2 id="conclusion">Conclusion</h2>

<p>I believe a good solution is deceptively simple, and therein lies its elegance.
For a production-grade solution, I would have robust exception handling, but
for a proof-of-concept like this, I did not spend much time with that.</p>]]></content><author><name>Abhijit Sarkar</name><email>contact@asarkar.com</email></author><category term="Technical" /><category term="technical" /><category term="java" /><category term="graph" /><category term="concurrency" /><summary type="html"><![CDATA[Scheduling interdependent tasks.]]></summary></entry><entry><title type="html">Couchbase on Kubernetes</title><link href="https://blogs.asarkar.com/technical/couchbase-kubernetes/" rel="alternate" type="text/html" title="Couchbase on Kubernetes" /><published>2017-10-24T00:00:00+00:00</published><updated>2017-10-24T00:00:00+00:00</updated><id>https://blogs.asarkar.com/technical/couchbase-kubernetes</id><content type="html" xml:base="https://blogs.asarkar.com/technical/couchbase-kubernetes/"><![CDATA[<h2 id="introduction">Introduction</h2>

<p>With the paradigm shift towards Microservices and Cloud-Native architecture (whether everyone is doing it right is another topic though), containers have become almost synonymous with those terms. Given that Kubernetes is a “Production-Grade Container Orchestration” (their words), and with features like horizontal scaling, self-healing, and storage orchestration, it is only natural that we are discussing running a database as a container on Kubernetes. In this post, I discuss running a Couchbase cluster on Kubernetes. I assume familiarity with both Couchbase and Kubernetes, as well as <a href="https://github.com/ReactiveX/RxJava">RxJava</a> and <a href="https://github.com/Netflix/Hystrix">Hystrix</a>, all of which are required for the rest of this write-up.</p>

<p>From now on, I will refer to the Couchbase server as <em>CB</em>, the Couchbase client application as the <em>client</em>, and Kubernetes as <em>K8S</em>.</p>

<p class="notice--warning">This is not a meant to be a recipe for running a highly-available, fully-redundant, multi-node CB cluster on K8S in Production. As of this writing, CB does not officially support running on K8S. This is a narrative of my experiences and learnings; YMMV and most likely will.</p>

<p class="notice--info">The term connection is used loosely here to indicate a logical connection, and is not to be taken as a physical TCP/IP connection.</p>

<h2 id="problem-statement">Problem Statement</h2>

<p>We want to run a CB cluster on K8S, and must support the following use cases:</p>
<ul>
  <li>The client startup must be resilient of CB failure/availability.</li>
  <li>The client must not fail the request, but return a degraded response instead, if CB is not available.</li>
  <li>The client must reconnect should a CB failover happens.</li>
  <li>CB server must be able restart without human intervention; while this may sound trivial, I will later discuss why it is not.</li>
</ul>

<p>We will not discuss the following:</p>
<ul>
  <li>Multi-node CB cluster.</li>
  <li><a href="https://developer.couchbase.com/documentation/server/current/clustersetup/failover.html">Failover</a>.</li>
</ul>

<h2 id="architecture">Architecture</h2>

<p>Now that we have laid out the basics, let’s analyze each item of the problem statement in detail.</p>

<ul>
  <li>
    <p><strong>Client Startup</strong></p>

    <p>Our client is a Spring Boot app, which used to use <a href="http://projects.spring.io/spring-data-couchbase/">Spring Data Couchbase</a> for CB integration. Spring Data Couchbase initializes various CB related beans at startup, and a failure to connect to CB is fatal. I tried to work my way around that limitation, but soon realized it wouldn’t work; I needed to roll my own CB client code. At this point, let me ask you this:</p>

    <blockquote>
      <p>What do you think is most needed to handle CB connection failure at startup?</p>
    </blockquote>

    <p>The answer is flippantly simple: Do not initialize CB connection at startup. When do we do it then? Umm, perhaps on the first request? That could work but the CB cluster and bucket opening are time-consuming operations, so unless we could tell the client “<em>hey, you are the lucky one to make the first request; please wait while we get our s**t together</em>”, we needed to find another way. It is the right idea, but we need a better implementation.</p>

    <p>We want to decouple the CB initialization from the request thread, and if at any time during the request we find CB connection not initialized, we start the initialization process on a separate thread while immediately failing the CB request. We also want to attempt initialization during the application startup, on a separate thread of course, which if successful, means that the first request will find a CB connection ready to be used. However, if the initialization fails during the startup, we do not want hundreds or thousands of subsequent requests to flood the CB server; we need to throttle the traffic, as well as put a sleep time between failures, should there be any. We need <em>Hystrix</em>.</p>

    <p>Good thing is that the CB <a href="https://github.com/couchbase/couchbase-java-client">Java client SDK</a> fully supports RxJava, and so does Hystrix, so they fit like peas in a pod.</p>

    <p>Last but not the least, since cluster and bucket opening are expensive operations, we cache the values once successful.</p>
  </li>
  <li>
    <p><strong>Degraded Response</strong></p>

    <p>I already touched upon this in the previous section. If at any time during the request we find CB connection not initialized, we immediately fail the CB request. The client handles the exception, and returns a successful response without CB data. If, however, CB connection had been initialized but later dropped, then the CB request blocks until it times out. As long as the CB request timeout is less than the HTTP request timeout, the caller receives a slightly delayed, but successful response.</p>
  </li>
  <li>
    <p><strong>Client Reconnection</strong></p>

    <p>Connection attempts if none had succeeded so far has been discussed in the startup section. Continuing on the previous section, reconnection after a successful connection had been established but later dropped is handled by CB SDK. This is also related to the following section, because when a CB node is restarted, it’s IP may very well change. The default CB client (and server) behavior is to use IPs for nodes, but in K8S, that does not work because of the aforementioned reason. We need to use DNS names that do not change with node restarts. We will see later how to implement this in K8S.</p>
  </li>
  <li>
    <p><strong>CB Server Node Restart</strong></p>

    <p>Discussed in the previous section.</p>
  </li>
</ul>

<h2 id="implementation">Implementation</h2>

<h3 id="cb-client">CB Client</h3>

<p>As previously mentioned, we use RxJava all the way. It makes a crucial difference between this approach and any other by introducing <em>delayed execution</em>. I dare say, as of this writing, no other solution exists publicly that employs this technique, and thus, is robust enough to handle CB connection failure at startup. My code uses a <code class="language-plaintext highlighter-rouge">Single&lt;AsyncCluster&gt;</code> and <code class="language-plaintext highlighter-rouge">Single&lt;AsyncBucket&gt;</code>, so we can delay the execution until subscription. I use the <a href="https://en.wikipedia.org/wiki/Factory_(object-oriented_programming)">factory pattern</a> to encapsulate the gory details of bootstrap and bucket opening. Using RxJava also allows me to declaratively spawn new threads, and handle failures gracefully.</p>

<blockquote>
  <p>“Talk is cheap. Show me the code” - Linus Torvalds.</p>
</blockquote>

<p>The lynchpin of this solution are three classes, <a href="https://github.com/asarkar/spring/blob/master/beer-demo/couchbase-lib/src/main/java/org/abhijitsarkar/spring/beer/factory/CouchbaseAsyncClusterFactory.java">CouchbaseAsyncClusterFactory</a>, <a href="https://github.com/asarkar/spring/blob/master/beer-demo/couchbase-lib/src/main/java/org/abhijitsarkar/spring/beer/factory/CouchbaseAsyncBucketFactory.java">CouchbaseAsyncBucketFactory</a>, and <a href="https://github.com/asarkar/spring/blob/master/beer-demo/couchbase-lib/src/main/java/org/abhijitsarkar/spring/beer/factory/AsyncBucketHystrixObservableCommand.java">AsyncBucketHystrixObservableCommand</a>. Technically, the first two are <code class="language-plaintext highlighter-rouge">interface</code>, with default implementations provided in the same Java files. The factory classes are singleton Spring beans that each store references to a <code class="language-plaintext highlighter-rouge">Single&lt;AsyncCluster&gt;</code> and <code class="language-plaintext highlighter-rouge">Single&lt;AsyncBucket&gt;</code>, respective to their names. The Hystrix command is responsible for opening the bucket, optionally creating it if does not already exist as well as creating a primary index, and controlling the access to the bucket creation/opening logic through a semaphore. I strongly encourage you to take a look before proceeding: The code speaks for itself, I hope, and there are ample comments in the Hystrix command.</p>

<p>I also called upon the <a href="https://msdn.microsoft.com/en-us/library/ff649690.aspx">Repository</a> design pattern, and created a <a href="https://github.com/asarkar/spring/blob/master/beer-demo/couchbase-lib/src/main/java/org/abhijitsarkar/spring/beer/repository/CouchbaseRepository.java">CouchbaseRepository</a> interface, and a <a href="https://github.com/asarkar/spring/blob/master/beer-demo/couchbase-lib/src/main/java/org/abhijitsarkar/spring/beer/repository/BaseCouchbaseRepository.java">BaseCouchbaseRepository</a> <code class="language-plaintext highlighter-rouge">abstract</code> class extending from it. Client code is usually expected to extend <code class="language-plaintext highlighter-rouge">BaseCouchbaseRepository</code>, and simply supply the generic type required. Of course, ambitious clients are free to implement <code class="language-plaintext highlighter-rouge">CouchbaseRepository</code>, or even use the factory classes directly. A sample <code class="language-plaintext highlighter-rouge">Repository</code> implementation is as follows, and it’s beyond trivial.</p>

<div class="language-plaintext highlighter-rouge"><div class="highlight"><pre class="highlight"><code>@Repository
public class CouchbaseBeerRepository extends BaseCouchbaseRepository&lt;Beer&gt; {
}
</code></pre></div></div>

<p>That’s it! The code using the <code class="language-plaintext highlighter-rouge">CouchbaseBeerRepository</code> looks like the following:</p>

<div class="language-plaintext highlighter-rouge"><div class="highlight"><pre class="highlight"><code>beerRepository.findOne(id)
    .map(ResponseEntity::ok)
    .onErrorReturn(t -&gt;  ResponseEntity.status(INTERNAL_SERVER_ERROR).build())
    .timeout(TIMEOUT_MILLIS, MILLISECONDS)
    .toBlocking()
    .value()
</code></pre></div></div>

<p>The complete <a href="https://github.com/asarkar/spring/tree/master/beer-demo/couchbase-lib/src">CB client library</a> code is on my GitHub, as well the <a href="https://github.com/asarkar/spring/tree/master/beer-demo/couchbase-client/src">client app</a> that uses it.</p>

<p class="notice">It appears that with CB server 5, the client holds on to the previously established but now invalid connections longer. To counter this, we set the “Socket Keepalive ErrorThreshold” = 1 for the <a href="https://developer.couchbase.com/documentation/server/current/sdk/java/client-settings.html">CB client</a>.</p>

<p class="notice">If you are using <a href="https://docs.spring.io/spring/docs/5.0.1.RELEASE/spring-framework-reference/web-reactive.html#spring-webflux">Spring 5 WebFlux</a>, you can go completely non-blocking and return a Reactive Streams <a href="https://github.com/reactive-streams/reactive-streams-jvm#1-publisher-code">Publisher</a>. That is a topic for another day.</p>

<p class="notice">Couchbase Java client SDK has a <a href="https://github.com/couchbase/couchbase-java-client/blob/master/src/main/java/com/couchbase/client/java/repository/CouchbaseAsyncRepository.java">CouchbaseAsyncRepository</a>, but since it requires an <code class="language-plaintext highlighter-rouge">AsyncBucket</code> for instantiation, it was not useful to me.</p>

<h3 id="cb-server">CB Server</h3>

<p>Official <a href="https://hub.docker.com/r/couchbase/server/">Couchbase Docker image</a> requires manual set up, thus I created <a href="https://github.com/asarkar/docker/tree/master/couchbase">my own image</a> that initializes an one-node cluster out of the box. It is available on Docker Hub as <code class="language-plaintext highlighter-rouge">asarkar/couchbase</code>. In order to make it work on K8S, we must set the node <a href="https://developer.couchbase.com/documentation/server/current/install/hostnames.html">hostname</a> to a DNS name, not IP. By doing so, when the node is restarted, the hostname does not change even though the IP may. To achieve this, we use a <a href="https://kubernetes.io/docs/concepts/workloads/controllers/statefulset/">StatefulSet</a>, along with a <a href="https://kubernetes.io/docs/concepts/services-networking/service/#headless-services">Headless service</a>. <code class="language-plaintext highlighter-rouge">StatefulSet</code> gives us predetermined <code class="language-plaintext highlighter-rouge">Pod</code> names, and when used with a Headless service, each node gets a network identity in the form of <code class="language-plaintext highlighter-rouge">$(statefulset name)-$(ordinal).$(service name).$(namespace).svc.cluster.local</code>, which is what we use for hostname. The service itself gets a DNS name <code class="language-plaintext highlighter-rouge">$(service name).$(namespace).svc.cluster.local</code> that resolves to a list of all the nodes. Refer to the <code class="language-plaintext highlighter-rouge">StatefulSet</code> and Headless service docs, as well as the <a href="https://kubernetes.io/docs/concepts/services-networking/dns-pod-service/">K8S DNS</a> docs for further details.</p>

<p>However, the above is not all. If we stop here, the CB client would be given the service DNS name, which in turn would resolve to the <code class="language-plaintext highlighter-rouge">Pods</code> during bootstrap. That does not work for two reasons:</p>

<ol>
  <li>
    <p>For high availability, the CB client SDK usually expects a list of nodes, not a single node.</p>
  </li>
  <li>
    <p>The “smart” client, as they call it, establishes a fully-connected mesh network with the CB server nodes. Depending on what services are running on which nodes, and how the data is replicated, the client makes the decision which node to talk to. Putting a service in front of the nodes completely breaks this process.</p>
  </li>
</ol>

<p>Luckily, there is something called <a href="https://en.wikipedia.org/wiki/SRV_record">DNS SRV Record</a>. Quoting K8S docs:</p>

<blockquote>
  <p>For each named port, the SRV record would have the form <code class="language-plaintext highlighter-rouge">_my-port-name._my-port-protocol.my-svc.my-namespace.svc.cluster.local</code> … For a headless service, this resolves to multiple answers, one for each pod that is backing the service</p>
</blockquote>

<p>And from CB docs for <a href="https://developer.couchbase.com/documentation/server/current/sdk/java/managing-connections.html">Managing Connections</a>, we come to know that the CB client can be configured to bootstrap with a DNS SRV Record in the form of <code class="language-plaintext highlighter-rouge">_couchbase._tcp.example.com</code>. Connecting the dots, if we name one of the exposed ports on the service <code class="language-plaintext highlighter-rouge">couchbase</code>, and provide the client with a  name <code class="language-plaintext highlighter-rouge">cb-svc.my-namespace.svc.cluster.local</code>, we are golden!</p>

<p class="notice--info">I initially assumed that the prefix <code class="language-plaintext highlighter-rouge">couchbase</code> was only an example, and could be any string as long as the FQN is a DNS SRV name. That is not the case; it is not at all difficult to make it configurable in the <a href="https://github.com/couchbase/couchbase-java-client/blob/master/src/main/java/com/couchbase/client/java/env/CouchbaseEnvironment.java">CouchbaseEnvironment</a>, but the CB guys decided to hard code the <code class="language-plaintext highlighter-rouge">couchbase</code> prefix instead.</p>

<p class="notice--info">If the CB client is running in the same K8S namespace, only <code class="language-plaintext highlighter-rouge">cb-svc</code> can be used without requiring the FQN.</p>

<p>Last but not the least, data persistence. After all, what good is a database that cannot persist data? Luckily, <code class="language-plaintext highlighter-rouge">StatefulSet</code> has first-class support for <a href="https://kubernetes.io/docs/concepts/workloads/controllers/statefulset/#stable-storage">Stable Storage</a>. Since we are running a single-node CB cluster on a dedicated K8S node, we chose to go with a <a href="https://kubernetes.io/docs/concepts/storage/volumes/#hostpath">hostPath</a>. We did try <a href="https://www.gluster.org/">GlusterFS</a> once, but it did not perform well under load, and we did not see the return on investment in fine-tuning it. In the future, if we loosen the restriction to run CB on a single K8S node, we can easily repopulate the data in a short time. For the period the data would not be available, the client would continue to return a degraded response.</p>

<p>My GitHub CB project contains the K8S <a href="https://github.com/asarkar/docker/tree/master/couchbase/k8s">manifests</a>. You can use those to run locally on <a href="https://github.com/kubernetes/minikube">Minikube</a>, or on any other cluster.</p>

<p class="notice--warning">There is a gotcha is with configuring the K8S Liveliness and Readiness Probes. We implemented the former as a simple probe of the 8091 port (here is a list of all CB <a href="https://developer.couchbase.com/documentation/server/current/install/install-ports.html">ports</a>). Implementing a smart probe for readiness, like checking the cluster status or something similar, ran into a problem where CB tries to contact all the nodes for determining cluster status, and until the readiness probe succeeds, K8S does not create a DNS entry for the node, thus resulting in a catch-22 situation. Thus, we did not implement a custom readiness probe.</p>

<h2 id="conclusion">Conclusion</h2>

<p>Like I mentioned in the beginning, CB does not officially support running on K8S. They say they are <a href="https://blog.couchbase.com/couchbase-openshift-enterprise-kubernetes-developer-preview-available/">working on it</a>, but not much details have been made available. There also exists an <a href="https://blog.couchbase.com/couchbase-on-kubernetes/">official blog</a>, but it falls short of addressing the issues discussed in this article. In order to be a first-class K8S citizen, CB has to support effortless scaling up and down, which means adding and removing nodes without the need for manual intervention, and step up their failover game. Data replication/migration when nodes are added or removed also needs to be handled transparent to the clients.
While time will tell the future of CB server on K8S, I do not see why, with some effort, the client solution here cannot be incorporated in the CB Java client SDK; I intend to approach them with that proposal, such that other people can also benefit from my effort and learning.</p>]]></content><author><name>Abhijit Sarkar</name><email>contact@asarkar.com</email></author><category term="Technical" /><category term="technical" /><category term="java" /><category term="couchbase" /><category term="kubernetes" /><summary type="html"><![CDATA[Running Couchbase Server on Kubernetes.]]></summary></entry><entry><title type="html">Spring Cloud Config Server - The Hidden Manual</title><link href="https://blogs.asarkar.com/technical/spring-cloud-config/" rel="alternate" type="text/html" title="Spring Cloud Config Server - The Hidden Manual" /><published>2017-02-09T00:00:00+00:00</published><updated>2017-02-09T00:00:00+00:00</updated><id>https://blogs.asarkar.com/technical/spring-cloud-config</id><content type="html" xml:base="https://blogs.asarkar.com/technical/spring-cloud-config/"><![CDATA[<h2 id="introduction">Introduction</h2>

<p>In 2015-2016, we redesigned a monolithic application into Microservices and chose the Spring Cloud Config for configuration
management.</p>

<p>Quoting the docs:</p>

<blockquote>
  <p>Spring Cloud Config provides server and client-side support for externalized configuration in a distributed system.</p>
</blockquote>

<p>To their credit, the Spring Cloud Config <a href="https://cloud.spring.io/spring-cloud-config/">documentation</a> is fairly good, but it
doesn’t go into the level of detail I was looking for. This post attempts to bridge that gap. I assume some basic familiarity with Spring Cloud Config, so if you are new to it, come back after having read the official documentation. If working with Spring Cloud, you may also find my post <a href="../netflix-eureka">Spring Cloud Netflix Eureka - The Hidden Manual</a> useful.</p>

<h2 id="basic-architecture">Basic Architecture</h2>

<p>The Config server is a Spring Boot application that is aware of the Spring <code class="language-plaintext highlighter-rouge">PropertySource</code> and <code class="language-plaintext highlighter-rouge">Environment</code> abstractions.
It serves properties in response to HTTP requests. It can also serve plain text files, thus acting like a simple Web Server.
I’m not going to repeat what’s already specified in the official docs, so let’s move on to what’s not mentioned there.</p>

<blockquote>
  <p>When reading config files from sub-directories, if more than one directory has files with identical names, the last one wins. I haven’t checked but would assume similar behavior for multiple Git repos as well. The question I’ve, and didn’t get time to look into, is what makes a <code class="language-plaintext highlighter-rouge">PropertySource</code> for config server? Is it an application, a Spring profile, a Git repo, a label, or some combination of these?</p>
</blockquote>

<h2 id="failover">Failover</h2>

<p>In spite of the built-in intelligence, Config server is pretty dumb in some cases. It doesn’t have any caching
mechanism, although properties are fairly easy to cache, and as of this writing, it doesn’t have first class support
for failover, as well. Depending on the backing property store, it either goes to the file system for every request, or
pulls from Git. The former is not that bad, even though caching would obviously help, but the latter could be an issue
if connection to Git is slow or the repo is somewhat large. Ticket <a href="https://github.com/spring-cloud/spring-cloud-config/issues/566">#566</a> complains about the last point.</p>

<p>Lack of failover is a bigger concern. Assuming the backing property store is a Git repo, if Config loses connectivity to Git, or for some other reason, fails to clone the repo, it fails the request. This is a problem for Singleton beans that attempt to fetch properties at startup, because the application fails to start up.
There are few tickets opened to address this, notably <a href="https://github.com/spring-cloud/spring-cloud-config/issues/617">#617</a> and <a href="https://github.com/spring-cloud/spring-cloud-config/issues/631">#631</a>. While Spring works towards providing first class
support for failover, I submitted a <a href="https://github.com/spring-cloud/spring-cloud-config/pull/634">pull request</a> to make <code class="language-plaintext highlighter-rouge">JGitEnvironmentRepository#refresh</code> method <code class="language-plaintext highlighter-rouge">public</code>, which is
the one that does the cloning. If <code class="language-plaintext highlighter-rouge">refresh</code> is made <code class="language-plaintext highlighter-rouge">public</code>, then Config server could be enhanced using Spring AOP to
handle failover. How, depends on your use case and design. One option is to return stale properties from the local repo if <code class="language-plaintext highlighter-rouge">refresh</code> fails. Another option is to return cached properties. Multiple Git repos could be configured as well, although in that case,
keeping them in sync would become another challenge.</p>

<h2 id="high-availability">High Availability</h2>

<p>Unlike Eureka, Config server doesn’t have a concept of peers. Thus, if you are serving properties from native file system,
the simplest option is to use a shared file system. You can them employ the usual techniques against hard disk failures
to provide high availability. If you are using Git, the simplest solution is to put Config server behind a load balancer,
or if using a container orchestration solution like Kubernetes, set up a Kubernetes service. The actual number of
Config server instances is then abstracted from the clients who only see the load balancer (physical or Kubernetes) URL.</p>

<p>If you expect that the config server may be temporarily unavailable when your client app starts, you can ask it to keep trying after a failure. First you need to set <code class="language-plaintext highlighter-rouge">spring.cloud.config.failFast=true</code>, and then you need to add <code class="language-plaintext highlighter-rouge">spring-retry</code> and <code class="language-plaintext highlighter-rouge">spring-boot-starter-aop</code> to your classpath. See the official docs for details. As of this writing, there is no server-side retry, although it wouldn’t be very difficult to add that using AOP or by submitting a pull request.</p>

<h2 id="dynamic-update">Dynamic Update</h2>

<p>It’s possible to dynamically update the properties without having to restart Config server or the client apps using Git
webhooks and Spring Cloud Bus. It requires a broker as the transport, and as of this writing, only RabbitMQ and Kafka are
supported. You need to add <code class="language-plaintext highlighter-rouge">spring-cloud-config-monitor</code> to the Config server, and a broker implementation like
<code class="language-plaintext highlighter-rouge">spring-cloud-starter-bus-kafka</code> to both the server and the client. Then you need to set up Git webhooks for the <code class="language-plaintext highlighter-rouge">/monitor</code>
endpoint, that’s brought in by the <code class="language-plaintext highlighter-rouge">spring-cloud-config-monitor</code>. I’ve tried this implementation using Kafka, and it worked,
but in our case, deploying and maintaining a queue for dynamic updates that’s going to be quite infrequent couldn’t be justified. Unfortunately, the monitor endpoint is tightly coupled with Spring Cloud Bus and it’s not possible to reuse the controller and the parsing of the events, but to choose how to react to the push notifications. I’ve
opened ticket <a href="https://github.com/spring-cloud/spring-cloud-config/issues/628">#628</a> to address this, although I don’t expect them to fix it anytime soon.</p>

<p>I ended up copying the monitor endpoint implementation from Spring. Then I pimped the Config server to fetch the list of all pods from Kubernetes, and send a HTTP POST to each one on the <code class="language-plaintext highlighter-rouge">/refresh</code> endpoint provided by Spring Boot Actuator. I used the <code class="language-plaintext highlighter-rouge">KubernetesClient</code> from the <code class="language-plaintext highlighter-rouge">io.fabric8:kubernetes-client</code> project for retrieving the list of pods. The actual code handles some advanced cases like rolling update and retries, but the theory behind it is as explained above and not complicated. The technique I used is similar to this <a href="https://github.com/asarkar/java/blob/master/concurrency-learning/src/main/java/org/abhijitsarkar/reactor/GroupsAndDelays.java">example</a>, and yes, the solution is fully <a href="http://www.reactivemanifesto.org/">reactive</a> within the limits of current Spring framework.</p>

<p>Config server is not the only choice though: <a href="https://github.com/Netflix/archaius">Netflix Archaius</a>, <a href="https://zookeeper.apache.org/">Apache ZooKeeper</a> and <a href="https://kubernetes.io/docs/user-guide/configmap/">Kubernetes ConfigMap</a> also provide configuration management, although none is aware of Spring <code class="language-plaintext highlighter-rouge">PropertySource</code> and <code class="language-plaintext highlighter-rouge">Environment</code> abstractions out of the box. In the end, Config server is a good choice if you are willing to put in some time to make it more robust.</p>]]></content><author><name>Abhijit Sarkar</name><email>contact@asarkar.com</email></author><category term="Technical" /><category term="technical" /><category term="java" /><category term="spring-cloud" /><category term="microservice" /><summary type="html"><![CDATA[How to set up Spring Cloud Config Server with high availability, failover and dynamic update.]]></summary></entry><entry><title type="html">Spring Cloud Netflix Eureka - The Hidden Manual</title><link href="https://blogs.asarkar.com/technical/netflix-eureka/" rel="alternate" type="text/html" title="Spring Cloud Netflix Eureka - The Hidden Manual" /><published>2017-01-18T00:00:00+00:00</published><updated>2017-01-18T00:00:00+00:00</updated><id>https://blogs.asarkar.com/technical/netflix-eureka</id><content type="html" xml:base="https://blogs.asarkar.com/technical/netflix-eureka/"><![CDATA[<h2 id="introduction">Introduction</h2>

<p>In 2015-2016, we redesigned a monolithic application into Microservices and chose the <a href="http://cloud.spring.io/spring-cloud-static/Camden.SR4/#_spring_cloud_netflix">Spring Cloud Netflix</a> as the foundation.</p>

<p>Quoting the docs:</p>

<blockquote>
  <p>(Spring Cloud Netflix) provides Netflix OSS integrations for Spring Boot apps through autoconfiguration and binding to the Spring Environment and other Spring programming model idioms.</p>
</blockquote>

<p>Overtime, we gained more familiarity with the framework, and I even contributed some pull requests. I thought I knew enough until I started looking into Eureka redundancy and failover. A quick proof of concept didn’t work and as I dug more, I came across other poor souls scouring the internet for similar information. Unfortunately, there wasn’t much to find. To their credit, the Spring Cloud documentation is fairly good, and there’s also a <a href="https://github.com/Netflix/eureka/wiki">Netflix Wiki</a>, but none went into the level of detail I was looking for. This post attempts to bridge that gap. I assume some basic familiarity with Eureka and service discovery, so if you’re new to those, come back after having read the Spring Cloud documentation.</p>

<h2 id="basic-architecture">Basic Architecture</h2>

<figure class=""><img src="/assets/images/eureka-architecture.png" alt="Eureka architecture" /><figcaption>
      <a href="https://github.com/Netflix/eureka/wiki/Eureka-at-a-glance#high-level-architecture">High level architecture</a> by Netflix, licensed under <a href="https://github.com/Netflix/eureka/blob/master/LICENSE">Apache License v2.0</a>.

    </figcaption></figure>

<p>Eureka has two basic components, server and client. Quoting the Netflix Wiki:</p>

<blockquote>
  <p>Eureka is a REST (Representational State Transfer) based service that is primarily used in the AWS cloud for locating services for the purpose of load balancing and failover of middle-tier servers. We call this service, the Eureka Server. Eureka also comes with a Java-based client component, the Eureka Client, which makes interactions with the service much easier. The client also has a built-in load balancer that does basic round-robin load balancing.</p>
</blockquote>

<p>A Eureka client application is referred to as an <em>instance</em>. There’s a subtle difference between a client application and Eureka client; the former is your application while the latter is a component provided by the framework.</p>

<p>Netflix designed Eureka to be highly dynamic. There are properties, and then there are properties that define intervals after which to look for changes in the first set of properties. This is a common paradigm, meaning most of these properties can be changed at runtime, and are picked up in the next refresh cycle. For example, the URL that the client uses to register with Eureka can change and that is picked up after 5min (configurable by <code class="language-plaintext highlighter-rouge">eureka.client.eurekaServiceUrlPollIntervalSeconds</code>). Most users will not need such dynamic updates but if you do, you can find all the configuration options as follows:</p>

<ul>
  <li>For Eureka server config: <code class="language-plaintext highlighter-rouge">org.springframework.cloud.netflix.eureka.server.EurekaServerConfigBean</code> that implements <code class="language-plaintext highlighter-rouge">com.netflix.eureka.EurekaServerConfig</code>. All properties are prefixed by <code class="language-plaintext highlighter-rouge">eureka.server</code>.</li>
  <li>For Eureka client config: <code class="language-plaintext highlighter-rouge">org.springframework.cloud.netflix.eureka.EurekaClientConfigBean</code> that implements <code class="language-plaintext highlighter-rouge">com.netflix.discovery.EurekaClientConfig</code>. All properties are prefixed by <code class="language-plaintext highlighter-rouge">eureka.client</code>.</li>
  <li>For Eureka instance config: <code class="language-plaintext highlighter-rouge">org.springframework.cloud.netflix.eureka.EurekaInstanceConfigBean</code> that implements (indirectly) <code class="language-plaintext highlighter-rouge">com.netflix.appinfo.EurekaInstanceConfig</code>. All properties are prefixed by <code class="language-plaintext highlighter-rouge">eureka.instance</code>.</li>
</ul>

<p>Refer to <a href="https://github.com/Netflix/eureka/wiki/Eureka-at-a-glance">Netflix Wiki</a> for further architectural details.</p>

<h2 id="eureka-instance-and-client">Eureka Instance and Client</h2>

<p>An instance is identified in Eureka by the <code class="language-plaintext highlighter-rouge">eureka.instance.instanceId</code> or, if not present, <code class="language-plaintext highlighter-rouge">eureka.instance.metadataMap.instanceId</code>. The instances find each other using <code class="language-plaintext highlighter-rouge">eureka.instance.appName</code>, which Spring Cloud defaults to <code class="language-plaintext highlighter-rouge">spring.application.name</code> or <code class="language-plaintext highlighter-rouge">UNKNOWN</code>, if the former is not defined. You’ll want to set <code class="language-plaintext highlighter-rouge">spring.application.name</code> because applications with the same name are clustered together in Eureka server. It’s not required to set <code class="language-plaintext highlighter-rouge">eureka.instance.instanceId</code>, as it defaults to <code class="language-plaintext highlighter-rouge">CLIENT IP:PORT</code>, but if you do set it, it must be unique within the scope of the <code class="language-plaintext highlighter-rouge">appName</code>. There’s also a <code class="language-plaintext highlighter-rouge">eureka.instance.virtualHostName</code>, but it’s not used by Spring, and is set to <code class="language-plaintext highlighter-rouge">spring.application.name</code> or <code class="language-plaintext highlighter-rouge">UNKNOWN</code> as described above.</p>

<p>If <code class="language-plaintext highlighter-rouge">registerWithEureka</code> is <code class="language-plaintext highlighter-rouge">true</code>, an instance registers with a Eureka server using a given URL; then onwards, it sends heartbeats every 30s (configurable by <code class="language-plaintext highlighter-rouge">eureka.instance.leaseRenewalIntervalInSeconds</code>). If the server doesn’t receive a heartbeat, it waits 90s (configurable by <code class="language-plaintext highlighter-rouge">eureka.instance.leaseExpirationDurationInSeconds</code>) before removing the instance from registry and there by disallowing traffic to that instance. Sending heartbeat is an asynchronous task; if the operation fails, it backs off exponentially by a factor of 2 until a maximum delay of <code class="language-plaintext highlighter-rouge">eureka.instance.leaseRenewalIntervalInSeconds * eureka.client.heartbeatExecutorExponentialBackOffBound</code> is reached. There is no limit to the number of retries for registering with Eureka.</p>

<p>The heartbeat is not the same as updating the instance information to the Eureka server. Every instance is represented by an <code class="language-plaintext highlighter-rouge">com.netflix.appinfo.InstanceInfo</code>, which is a bunch of information about the instance. The <code class="language-plaintext highlighter-rouge">InstanceInfo</code> is sent to the Eureka server at regular intervals, starting at 40s after startup (configurable by <code class="language-plaintext highlighter-rouge">eureka.client.initialInstanceInfoReplicationIntervalSeconds</code>), and then onwards every 30s (configurable by <code class="language-plaintext highlighter-rouge">eureka.client.instanceInfoReplicationIntervalSeconds</code>).</p>

<p>If <code class="language-plaintext highlighter-rouge">eureka.client.fetchRegistry</code> is <code class="language-plaintext highlighter-rouge">true</code>, the client fetches the Eureka server registry at startup and caches it locally. From then on, it only fetches the delta (this can be turned off by setting <code class="language-plaintext highlighter-rouge">eureka.client.shouldDisableDelta</code> to <code class="language-plaintext highlighter-rouge">false</code>, although that’d be a waste of bandwidth). The registry fetch is an asynchronous task scheduled every 30s (configurable by <code class="language-plaintext highlighter-rouge">eureka.client.registryFetchIntervalSeconds</code>). If the operation fails, it backs off exponentially by a factor of 2 until a maximum delay of <code class="language-plaintext highlighter-rouge">eureka.client.registryFetchIntervalSeconds * eureka.client.cacheRefreshExecutorExponentialBackOffBound</code> is reached. There is no limit to the number of retries for fetching the registry information.</p>

<p>The client tasks are scheduled by <code class="language-plaintext highlighter-rouge">com.netflix.discovery.DiscoveryClient</code>, which Spring Cloud extends in <code class="language-plaintext highlighter-rouge">org.springframework.cloud.netflix.eureka.CloudEurekaClient</code>.</p>

<h3 id="why-does-it-take-so-long-to-register-an-instance-with-eureka">Why Does It Take So Long to Register an Instance with Eureka?</h3>

<p class="notice">Mostly copied from <a href="https://github.com/spring-cloud/spring-cloud-netflix/issues/373">spring-cloud-netflix#373</a> with my own spin put on it.</p>

<ol>
  <li>
    <p>Client Registration</p>

    <p>The first heartbeat happens 30s (described earlier) after startup so the instance doesn’t appear in the Eureka registry before this interval.</p>
  </li>
  <li>
    <p>Server Response Cache</p>

    <p>The server maintains a response cache that is updated every 30s (configurable by <code class="language-plaintext highlighter-rouge">eureka.server.responseCacheUpdateIntervalMs</code>). So even if the instance is just registered, it won’t appear in the result of a call to the <code class="language-plaintext highlighter-rouge">/eureka/apps</code> REST endpoint. However, the instance may appear on the Eureka Dashboard just after registration. This is because the Dashboard bypasses the response cache used by the REST API. If you know the instanceId, you can still get some details from Eureka about it by calling <code class="language-plaintext highlighter-rouge">/eureka/apps/&lt;appName&gt;/&lt;instanceId&gt;</code>. This endpoint doesn’t make use of the response cache.</p>

    <p>So, it may take up to another 30s for other clients to discover the newly registered instance.</p>
  </li>
  <li>
    <p>Client Cache Refresh</p>

    <p>Eureka client maintain a cache of the registry information. This cache is refreshed every 30s (described earlier). So, it may take another 30s before a client decides to refresh its local cache and discover other newly registered instances.</p>
  </li>
  <li>
    <p>LoadBalancer Refresh</p>

    <p>The load balancer used by Ribbon gets its information from the local Eureka client. Ribbon also maintains a local cache to avoid calling the client for every request. This cache is refreshed every 30s (configurable by <code class="language-plaintext highlighter-rouge">ribbon.ServerListRefreshInterval</code>). So, it may take another 30s before Ribbon can make use of the newly registered instance.</p>

    <p>In the end, it may take up to 2min before a newly registered instance starts receiving traffic from the other instances.</p>
  </li>
</ol>

<h2 id="eureka-server">Eureka Server</h2>

<p>The Eureka server has a peer-aware mode, in which it replicates the service registry across other Eureka servers, to provide load balancing and resiliency. Peer-aware mode is the default so a Eureka server also acts as a Eureka client and registers to a peer on a given URL. This is how you should run Eureka in production but for demo or proof of concepts, you can run in standalone mode by setting <code class="language-plaintext highlighter-rouge">registerWithEureka</code> to <code class="language-plaintext highlighter-rouge">false</code>.</p>

<p>When the eureka server starts up it tries to fetch all the registry information from the peer eureka nodes. This operation is retried 5 times for each peer (configurable by <code class="language-plaintext highlighter-rouge">eureka.server.numberRegistrySyncRetries</code>). If for some reason this operation fails, the server does not allow clients to get the registry information for 5min (configurable by <code class="language-plaintext highlighter-rouge">eureka.server.getWaitTimeInMsWhenSyncEmpty</code>).</p>

<p>Eureka peer awareness brings in a whole new level of complication by introducing a concept called “self-preservation” (can be turned off by setting <code class="language-plaintext highlighter-rouge">eureka.server.enableSelfPreservation</code> to <code class="language-plaintext highlighter-rouge">false</code>). In fact, when looking online, this is where I saw most people tripping on. From Netflix Wiki:</p>

<blockquote>
  <p>When the Eureka server comes up, it tries to get all of the instance registry information from a neighboring node. If there is a problem getting the information from a node, the server tries all of the peers before it gives up. If the server is able to successfully get all of the instances, it sets the renewal threshold that it should be receiving based on that information. If any time, the renewals falls below the percent configured for that value, the server stops expiring instances to protect the current instance registry information.</p>
</blockquote>

<p>The math works like this: If there are two clients registered to a Eureka instance, each one sending a heartbeat every 30s, the instance should receive 4 heartbeats in a minute. Spring adds a lower minimum of 1 to that (configurable by <code class="language-plaintext highlighter-rouge">eureka.instance.registry.expectedNumberOfRenewsPerMin</code>), so the instance expects to receive 5 heartbeats every minute. This is then multiplied by 0.85 (configurable by <code class="language-plaintext highlighter-rouge">eureka.server.renewalPercentThreshold</code>) and rounded to the next integer, which brings us back to 5 again. If anytime there are less than 5 heartbeats received by Eureka in 15min (configurable by <code class="language-plaintext highlighter-rouge">eureka.server.renewalThresholdUpdateIntervalMs</code>), it goes into self-preservation mode and stops expiring already registered instances.</p>

<p>Eureka server makes an implicit assumption that the clients are sending their heartbeat at a fixed rate of 1 every
30s. If two instances are registered, the server expects to receive <code class="language-plaintext highlighter-rouge">(2 * 2 + 1 ) * 0.85 = 5</code> heartbeats every minute.
If the renewal rate drops below this value, the self-preservation mode is activated. Now, if the clients are sending heartbeats much faster (say, every 10s), the server receives 12 heartbeats per minute and keeps receiving 6/min even if
one of the instances goes down. Thus, the self protection mode is not activated even though it should be. This is why
it’s not advisable to change <code class="language-plaintext highlighter-rouge">eureka.client.instanceInfoReplicationIntervalSeconds</code>. You can instead tinker with <code class="language-plaintext highlighter-rouge">eureka.server.renewalPercentThreshold</code> if you must.</p>

<p class="notice--info">Eureka peers don’t count towards the expected number of renewals, but the heartbeats from them is considered within
the number of renewals received last minute. In peer-aware mode, the heartbeats can go to any Eureka instance; this is important when running behind a load balancer or as a Kubernetes service, where the heartbeats are sent in Round-robin mode (usually) to each instance.</p>

<p class="notice--warning">The Eureka server doesn’t come out of self-preservation mode until the renewals rise above the threshold. This may cause the clients to get the instances that do not exist anymore. Refer to <a href="https://github.com/Netflix/eureka/wiki/Understanding-Eureka-Peer-to-Peer-Communication">Understanding Eureka Peer to Peer Communication</a></p>

<p>One more thing: There is a gotcha with running more than one Eureka server on the same host. Netflix code (<code class="language-plaintext highlighter-rouge">com.netflix.eureka.cluster.PeerEurekaNodes.isThisMyUrl</code>) filters out the peer URLs that are on the same host. This may have been done to prevent the server registering as its own peer (I’m guessing here) but because they don’t check for the port, peer awareness doesn’t work unless the Eureka hostnames in the <code class="language-plaintext highlighter-rouge">eureka.client.serviceUrl.defaultZone</code> are different. The hacky workaround for this is to define unique hostnames and then map them to <code class="language-plaintext highlighter-rouge">127.0.0.1</code> in the <code class="language-plaintext highlighter-rouge">/etc/hosts</code> file (or its Windows equivalent). Spring Cloud doc talks about this workaround but fails to mention why it’s needed. Now you know.</p>

<h2 id="regions-and-availability-zones">Regions and Availability Zones</h2>

<figure class=""><img src="/assets/images/aws-regions.png" alt="Eureka architecture" /><figcaption>
      AWS Regions and Availability Zones.

    </figcaption></figure>

<p>Eureka was designed to run in AWS and uses many concepts and terminologies that are specific to AWS. Regions and Zones are two such things. From <a href="http://docs.aws.amazon.com/AWSEC2/latest/UserGuide/using-regions-availability-zones.html">AWS doc</a>:</p>

<blockquote>
  <p>Amazon EC2 is hosted in multiple locations world-wide. These locations are composed of regions and Availability Zones. Each region is a separate geographic area. Each region has multiple, isolated locations known as Availability Zones … Each region is completely independent. Each Availability Zone is isolated, but the Availability Zones in a region are connected through low-latency links.</p>
</blockquote>

<p>The Eureka dashboard displays the <em>Environment</em> and <em>Data center</em>. The values are set to <code class="language-plaintext highlighter-rouge">test</code> and <code class="language-plaintext highlighter-rouge">default</code>, respectively, from <code class="language-plaintext highlighter-rouge">org.springframework.cloud.netflix.eureka.server.EurekaServerBootstrap</code> by using <code class="language-plaintext highlighter-rouge">com.netflix.config.ConfigurationManager</code>. There are various lookups and fallbacks, so if for some reason you need to change those, refer to the source code of the aforementioned classes.</p>

<p>The Eureka client prefers the same zone by default (configurable by <code class="language-plaintext highlighter-rouge">eureka.client.preferSameZone</code>). From <code class="language-plaintext highlighter-rouge">com.netflix.discovery.endpoint.EndpointUtils.getServiceUrlsFromDNS</code> Javadoc:</p>

<blockquote>
  <p>Get the list of all eureka service urls from DNS for the eureka client to talk to. The client picks up the service url from its zone and then fails over to other zones randomly. If there are multiple servers in the same zone, the client once again picks one randomly. This way the traffic will be distributed in the case of failures.</p>
</blockquote>

<p class="notice--info">Ticket <a href="https://github.com/spring-cloud/spring-cloud-netflix/issues/203">spring-cloud-netflix#203</a> is open as of this writing where several people talk about regions and zones. I’ve not verified any of that so I can’t comment on how regions and zones work with Eureka.</p>

<h2 id="high-availability-ha">High Availability (HA)</h2>

<p class="notice">Mostly copied from <a href="https://github.com/spring-cloud/spring-cloud-netflix/issues/203">spring-cloud-netflix#203</a> with my own spin put on it.</p>

<ul>
  <li>The HA strategy seems to be one main Eureka server (<code class="language-plaintext highlighter-rouge">server1</code>) with backup(s) (<code class="language-plaintext highlighter-rouge">server2</code>).</li>
  <li>A client is provided with a list of Eureka servers through config (or DNS or <code class="language-plaintext highlighter-rouge">/etc/hosts</code>)</li>
  <li>Client attempts to connect to <code class="language-plaintext highlighter-rouge">server1</code>; at this point, <code class="language-plaintext highlighter-rouge">server2</code> is sitting idle.</li>
  <li>In case <code class="language-plaintext highlighter-rouge">server1</code> is unavailable, the client tries the next one from the list.</li>
  <li>When <code class="language-plaintext highlighter-rouge">server1</code> comes back online, client goes back to using <code class="language-plaintext highlighter-rouge">server1</code>.</li>
</ul>

<p>Of course <code class="language-plaintext highlighter-rouge">server1</code> and <code class="language-plaintext highlighter-rouge">server2</code> can be ran in peer-aware mode, and their registries replicated. But that’s orthogonal to client registration.</p>]]></content><author><name>Abhijit Sarkar</name><email>contact@asarkar.com</email></author><category term="Technical" /><category term="technical" /><category term="java" /><category term="spring-cloud" /><category term="netflix" /><category term="microservice" /><summary type="html"><![CDATA[Internal working of the Spring Cloud Eureka discovery service.]]></summary></entry><entry><title type="html">What’s Wrong with Java Collections - part I</title><link href="https://blogs.asarkar.com/technical/java-collections-1/" rel="alternate" type="text/html" title="What’s Wrong with Java Collections - part I" /><published>2016-12-20T00:00:00+00:00</published><updated>2016-12-20T00:00:00+00:00</updated><id>https://blogs.asarkar.com/technical/java-collections-1</id><content type="html" xml:base="https://blogs.asarkar.com/technical/java-collections-1/"><![CDATA[<p>Java 1.2 introduced the Collections framework that standardized how developers would manage groups of objects in their code. From the Java SE <a href="http://docs.oracle.com/javase/tutorial/collections/intro/index.html">tutorial</a>:</p>

<blockquote>
  <p>A collection — sometimes called a container — is simply an object that groups multiple elements into a single unit. Collections are used to store, retrieve, manipulate, and communicate aggregate data.</p>
</blockquote>

<p class="notice--info">Here onwards, I’m going to use the word “collection” to refer to a logical group of things represented by the “the Collections framework” in Java. If I need to refer to the <code class="language-plaintext highlighter-rouge">java.util.Collection</code> interface or the <code class="language-plaintext highlighter-rouge">java.util.Collections</code> utility class, I’ll use the simple class name, with a capital ‘C’, and style the word differently.</p>

<p>Java 1.5 (rebranded as Java SE 5) introduced generics which provided compile time type safety to collections. However,
the collections is not all it’s cracked up to be. In this series of articles, I’ll explore the various design
issues with the collections.</p>

<ol>
  <li>
    <p><strong><code class="language-plaintext highlighter-rouge">Map</code> is not a <code class="language-plaintext highlighter-rouge">Collection</code></strong></p>

    <p>The <a href="https://docs.oracle.com/javase/8/docs/technotes/guides/collections/overview.html">official docs</a> say:</p>

    <blockquote>
      <p>…interfaces…based on <code class="language-plaintext highlighter-rouge">java.util.Map</code>…are not true collections. However, these interfaces
contain collection-view operations…</p>
    </blockquote>

    <p>Consider a use case where you need to extract HTTP request headers that start with a certain prefix.
The <code class="language-plaintext highlighter-rouge">HttpServletRequest</code> doesn’t have any methods to return a header map, only a hideous
<code class="language-plaintext highlighter-rouge">Enumeration getHeaderNames</code> (why Java, why?). Let’s take a better abstraction from the Spring Web MVC
framework, one of the most popular application frameworks for the Java platform. In Spring, you can get a <code class="language-plaintext highlighter-rouge">HttpHeaders</code>
which is basically a wrapper around a <code class="language-plaintext highlighter-rouge">Map&lt;String,List&lt;String&gt;&gt;</code>.
Using Java 8, and some static imports, the code for our use case may look like the following:</p>

    <div class="language-plaintext highlighter-rouge"><div class="highlight"><pre class="highlight"><code>headers.keySet()
    .stream()
    .filter(k -&gt; k.startsWith(prefix))
    .collect(toMap(Function::identity, headers::get));
</code></pre></div>    </div>
    <p>While the above works, all we really care about is the <code class="language-plaintext highlighter-rouge">filter</code> operation. The rest of the code is just a means to
an end. If this looks verbose to you, try implementing this in pre Java 8.</p>

    <p>Now let’s try to do the same thing using the class <code class="language-plaintext highlighter-rouge">Headers</code> from the Play framework, another popular web
application framework, and with Scala. There is a method <code class="language-plaintext highlighter-rouge">toMap</code> in <code class="language-plaintext highlighter-rouge">Headers</code> trait that returns a
<code class="language-plaintext highlighter-rouge">Map[String, Seq[String]]</code>. <code class="language-plaintext highlighter-rouge">Map</code> trait in Scala extends <code class="language-plaintext highlighter-rouge">Traversable</code> which has a <code class="language-plaintext highlighter-rouge">filter</code> method. Thus:</p>

    <div class="language-plaintext highlighter-rouge"><div class="highlight"><pre class="highlight"><code>request.headers
    .toMap
    .filter(_.startsWith(prefix))
</code></pre></div>    </div>

    <p class="notice--info">I have taken the liberty to use some Scala <a href="https://en.wikipedia.org/wiki/Syntactic_sugar">syntactic sugar</a>
(I love dropping buzzwords to programmers working with imperative languages because they go like, “wow,
that’s so cool, can I buy you a drink?”).</p>

    <p>You don’t need to know Scala in order to appreciate the simplicity of the second solution. A map is nothing but
a collection of key-value pairs. Why did they not add a <code class="language-plaintext highlighter-rouge">stream</code> method in the <code class="language-plaintext highlighter-rouge">Map</code> interface with Java 8 is beyond me.</p>

    <p>You can get pretty darn close to the Scala solution using the excellent <a href="http://www.javaslang.io/">Javaslang</a> library:</p>

    <div class="language-plaintext highlighter-rouge"><div class="highlight"><pre class="highlight"><code>HashMap.&lt;String, List&lt;String&gt;&gt;ofAll(httpHeaders)
    .filter((k, v) -&gt; k.startsWith(prefix));
</code></pre></div>    </div>

    <p class="notice--info">Javaslang has a <code class="language-plaintext highlighter-rouge">Multimap</code> interface but none of its implementations has a method to start from a <code class="language-plaintext highlighter-rouge">java.util.Map</code>,
so I’m using a <code class="language-plaintext highlighter-rouge">HashMap&lt;String, List&lt;String&gt;&gt;</code> I’ve ticket <a href="https://github.com/javaslang/javaslang/issues/1767">1767</a> open for this on their Github.</p>
  </li>
  <li>
    <p><strong><code class="language-plaintext highlighter-rouge">String</code> is not a <code class="language-plaintext highlighter-rouge">Collection</code></strong></p>

    <p>Let’s see some code that drops characters other than the vowels from a string.</p>

    <div class="language-plaintext highlighter-rouge"><div class="highlight"><pre class="highlight"><code>String s = "alice";

s.chars()
    .filter(this::isVowel)
    .mapToObj(i -&gt; (char)i)
    .collect(joining());
</code></pre></div>    </div>
    <p>where <code class="language-plaintext highlighter-rouge">isVowel</code> simply checks against a predefined list of integers (ASCII code for vowels, upper and lower cases).</p>

    <p>The Scala solution is trivial:</p>

    <div class="language-plaintext highlighter-rouge"><div class="highlight"><pre class="highlight"><code>s.filter(isVowel)
</code></pre></div>    </div>

    <p>Javaslang:</p>

    <div class="language-plaintext highlighter-rouge"><div class="highlight"><pre class="highlight"><code>CharSeq.of(s)
    .filter(this::isVowel)
    .toString();
</code></pre></div>    </div>

    <p>Too easy? I thought so. Let’s consider another example where you need to calculate the <a href="https://en.wikipedia.org/wiki/Run-length_encoding">run-length encoding</a> of the characters. The output should be a list of tuples. For examples, given the word “bookkeeper”, the output should be a collection with the pairs (b, 1), (o, 2), (k, 2), (e, 2), (p, 1), (e, 1), (r, 1).</p>

    <p>I’ll implement the Javaslang and Scala solutions but will leave the Java 8 solution as a challenge for you. For a pre Java 8 solution, although not exactly in the same format as asked for here, see <a href="https://www.rosettacode.org/wiki/Run-length_encoding#Java">this</a>.</p>

    <p class="notice--info">Hint: Look at <a href="https://docs.oracle.com/javase/8/docs/api/java/util/stream/Collector.html">Collector</a>.</p>

    <p>Scala:</p>

    <div class="language-plaintext highlighter-rouge"><div class="highlight"><pre class="highlight"><code>def rle(s: String) = {
    val packed = s.foldLeft(('\u0000', 0, Seq.empty[(Char, Int)])) {(acc, elem) =&gt;
        if (elem == acc._1 || acc._2 == 0) // keeps accumulating dupes
            (elem, acc._2 + 1, acc._3)
        else // adds accumulated dupes to result and starts new dupes accumulator
            (elem, 1, acc._3 :+ (acc._1, acc._2))
    }

    packed._3 :+ (packed._1, packed._2) // adds last one
}
</code></pre></div>    </div>

    <p>Javaslang:</p>

    <div class="language-plaintext highlighter-rouge"><div class="highlight"><pre class="highlight"><code>public List&lt;Tuple2&lt;Character, Integer&gt;&gt; rle(String s) {
    Tuple3&lt;Character, Integer, List&lt;Tuple2&lt;Character, Integer&gt;&gt;&gt; zero =
            new Tuple3&lt;&gt;('\u0000', 0, new ArrayList&lt;Tuple2&lt;Character, Integer&gt;&gt;());
    Tuple3&lt;Character, Integer, List&lt;Tuple2&lt;Character, Integer&gt;&gt;&gt; packed = CharSeq.of(s)
            .foldLeft(zero, (acc, elem) -&gt; {
                if (elem == acc._1 || acc._2 == 0) {
                    return new Tuple3(elem, acc._2 + 1, acc._3);
                } else {
                    acc._3.add(new Tuple2(acc._1, acc._2));
                    return new Tuple3(elem, 1, acc._3);
               }
            });

    packed._3.add(new Tuple2(packed._1, packed._2));

    return packed._3;
}
</code></pre></div>    </div>

    <p>Again, Javaslang follows on the heels of the Scala solution within the limitations of the language.</p>

    <p class="notice--warning">In the code samples above, adding an item to the end can be highly expensive for large collections. Sadly, a detail discussion of performance optimization of various collection operations is out of the scope for this article.</p>

    <p>The examples above may be contrived but that’s not my point. <code class="language-plaintext highlighter-rouge">String</code> really is a collection of characters;
it in fact, implements <code class="language-plaintext highlighter-rouge">CharSequence</code>. Why does it not implement <code class="language-plaintext highlighter-rouge">Collection</code> then? You will have to ask the JDK designers. Luckily, all is not lost; the <code class="language-plaintext highlighter-rouge">chars</code> method allows for a <code class="language-plaintext highlighter-rouge">String</code> to be treated like a <code class="language-plaintext highlighter-rouge">Collection</code>.</p>
  </li>
</ol>

<p>In the second part of this series, I will discuss some other design problems of the collections.</p>]]></content><author><name>Abhijit Sarkar</name><email>contact@asarkar.com</email></author><category term="Technical" /><category term="technical" /><category term="java" /><category term="collections" /><summary type="html"><![CDATA[Shortcomings of the Java Collections Framework.]]></summary></entry><entry><title type="html">Subversion to Git Migration</title><link href="https://blogs.asarkar.com/technical/svn-to-git/" rel="alternate" type="text/html" title="Subversion to Git Migration" /><published>2016-10-05T00:00:00+00:00</published><updated>2016-10-05T00:00:00+00:00</updated><id>https://blogs.asarkar.com/technical/svn-to-git</id><content type="html" xml:base="https://blogs.asarkar.com/technical/svn-to-git/"><![CDATA[<p>Recently, I migrated about 20 projects from SVN to Git. While this may seem like a straightforward job, especially with many migration guides available on the internet, the devil is really in the details. None of the guides that I found talks about the potentials gotchas in the migration process, which is why this article exists. In this article, I’ll focus on the pitfalls that can come back to bite you and omit some of the mundane details for brevity.</p>

<p>Atlassian has a multipage <a href="https://www.atlassian.com/git/tutorials/migrating-overview">migration guide</a> that you can refer to.
The basic steps involved are:</p>

<ol>
  <li>
    <p><strong>Prepare the migration environment</strong></p>

    <p>The migration should be done on a case-sensitive file system to avoid corrupting the repository. If you’ve a Linux system available for the migration, skip the rest of this section. Atlassian has instructions for mounting a case-sensitive file system on Windows and Mac OS X (both file systems are case-insensitive), but it seemed more trouble than its worth, so I did the migration using a Debian Docker image I’d previously created for development purposes. <del>The image is published to my Docker Hub account, and comes with JDK 8, SVN and Git installed.</del> Having created a container from the image, install <code class="language-plaintext highlighter-rouge">git-svn</code>.</p>

    <p class="notice--info">I no longer have the Debian image available publicly; you can use <code class="language-plaintext highlighter-rouge">asarkar/alpine-plus</code> instead and adapt the following commands for Alpine.</p>

    <div class="language-plaintext highlighter-rouge"><div class="highlight"><pre class="highlight"><code>$ docker run -it abhijitsarkar/docker:debian-dev bash
dev@b22ce7fa8250:~$ sudo apt-get update
dev@b22ce7fa8250:~$ sudo apt-get install git-svn
</code></pre></div>    </div>

    <p>Refer to the Docker official site if you need further details.</p>

    <p><del>The login user is <code class="language-plaintext highlighter-rouge">dev</code>, the password is the same. <code class="language-plaintext highlighter-rouge">dev</code> has <code class="language-plaintext highlighter-rouge">sudo</code> access to run as root.</del></p>

    <p class="notice--info">The Alpine image runs as <code class="language-plaintext highlighter-rouge">root</code>.</p>

    <p>If you’re not familiar with Docker, I recommend using a virtual machine for doing the migration. Oracle <a href="https://www.virtualbox.org">VirtualBox</a> is free and so are most Linux distros, so take your pick.</p>
  </li>
  <li>
    <p><strong>Create an authors mapping file</strong></p>

    <p>This file maps the SVN usernames to Git committers. SVN stores only usernames while Git stores full names and emails. Thus, each entry in the mapping file will map a SVN username to a Git committer full name and email. Something like this:</p>

    <p><code class="language-plaintext highlighter-rouge">username = Full Name &lt;email&gt;</code></p>

    <p>How long this step will take depends on the format of the SVN username, the number of users, and the number of SVN repositories being migrated.</p>

    <p class="notice--info">The authors file is simply used for converting the history and the users don’t actually need to exist in the Git system. Don’t be confused if there’re users that no longer work for your organization, keep those entries as usual.</p>

    <p class="notice--warning">The Atlassian guide assumes that the SVN repo you are extracting the author information from doesn’t require authentication, which almost always is false. Thus the command they’ve in the guide doesn’t work. Use the following command instead:</p>

    <div class="language-plaintext highlighter-rouge"><div class="highlight"><pre class="highlight"><code>$ java -jar svn-migration-scripts.jar authors &lt;svn-repo&gt; \
&lt;svn-username&gt; &lt;svn-password&gt; &gt; authors.txt
</code></pre></div>    </div>
  </li>
  <li>
    <p><strong>Clone the SVN repository</strong></p>

    <p>There are various important details that the Atlassian guide misses to mention regarding this phase.</p>

    <ul>
      <li>
        <p>Limiting the beginning and ending SVN revision:</p>

        <p>Because SVN <code class="language-plaintext highlighter-rouge">trunk</code>, <code class="language-plaintext highlighter-rouge">branches</code> and <code class="language-plaintext highlighter-rouge">tags</code> can be created inside any regular directory, you may have multiple directories in SVN with their own <code class="language-plaintext highlighter-rouge">trunk</code>, <code class="language-plaintext highlighter-rouge">branches</code> and <code class="language-plaintext highlighter-rouge">tags</code>. We did. SVN tracks all changes using a global unique revision number that is incremented for every commit. Thus if you make a commit on directory <code class="language-plaintext highlighter-rouge">dir1</code>, it gets a unique revision number, and next time you commit something to <code class="language-plaintext highlighter-rouge">dir2</code>, it gets a higher revision number.</p>

        <p>During conversion, <code class="language-plaintext highlighter-rouge">dir1</code> with it’s <code class="language-plaintext highlighter-rouge">trunk</code>, <code class="language-plaintext highlighter-rouge">branches</code> and <code class="language-plaintext highlighter-rouge">tags</code> is probably going to become a Git repo. In order to avoid SVN beginning the history from the earliest available revision number, it’ll save you a lot of time, and unrelated history, if you just begin from the earliest available revision number for that particular SVN repo. You can find that number by using the following command:</p>

        <p><code class="language-plaintext highlighter-rouge">$ svn log &lt;svn-repo&gt; | tail</code>
where <code class="language-plaintext highlighter-rouge">&lt;svn-repo&gt;</code> is a URL to <code class="language-plaintext highlighter-rouge">dir1</code>.</p>

        <p>Two other useful options are <code class="language-plaintext highlighter-rouge">--no-minimize-url</code> and <code class="language-plaintext highlighter-rouge">--no-metadata</code>. Refer to the <code class="language-plaintext highlighter-rouge">git-svn</code> <a href="https://git-scm.com/docs/git-svn">man page</a> for details.</p>

        <p>Thus, the command to convert a SVN repo with standard layout may be as follows:</p>

        <div class="language-plaintext highlighter-rouge"><div class="highlight"><pre class="highlight"><code>$ git svn clone -r 12345:HEAD --username &lt;svn-username&gt; --no-minimize-url \
--stdlayout --authors-file=authors.txt \
&lt;svn-repo&gt;/&lt;project&gt; &lt;git-repo-name&gt;
</code></pre></div>        </div>
        <p>where <code class="language-plaintext highlighter-rouge">12345</code> is the earliest available revision number corresponding to the repo.</p>
      </li>
      <li>
        <p>Dealing with non-standard layout:</p>

        <p>If the repo doesn’t follow “standard layout”, meaning it doesn’t have the usual <code class="language-plaintext highlighter-rouge">trunk</code>, <code class="language-plaintext highlighter-rouge">branches</code> and <code class="language-plaintext highlighter-rouge">tags</code> or has them but not all in lower case, then you need to tailor the command to the custom layout. Assuming the trunk is named as <code class="language-plaintext highlighter-rouge">TRUNK</code>, and that you don’t care about the branches and tags, the <code class="language-plaintext highlighter-rouge">clone</code> command will become as follows:</p>

        <div class="language-plaintext highlighter-rouge"><div class="highlight"><pre class="highlight"><code>$ git svn clone -r 12345:HEAD --username &lt;svn-username&gt; --no-minimize-url \
--trunk=TRUNK/&lt;project&gt; --prefix='' -authors-file=authors.txt \
&lt;svn-repo&gt; &lt;git-repo-name&gt;
</code></pre></div>        </div>

        <p class="notice--warning">Note the <code class="language-plaintext highlighter-rouge">--prefix=''</code> option. Without it, the Atlassian migration scripts fail to sync with SVN once the initial migration is done but the cutover isn’t. You can go crazy with the custom layout; refer to the <code class="language-plaintext highlighter-rouge">git-svn</code> man page for other options.</p>
      </li>
      <li>
        <p>Merging multiple SVN directories into one Git repo:</p>

        <p>To do this, you’ll need to use a SVN URL that is one or more levels above the topmost directory that you want to merge, and use <code class="language-plaintext highlighter-rouge">--include-paths</code> and/or <code class="language-plaintext highlighter-rouge">--exclude-paths</code> filters. Something like this:</p>

        <div class="language-plaintext highlighter-rouge"><div class="highlight"><pre class="highlight"><code>$ git svn clone -r 12345:HEAD --username &lt;svn-username&gt; --no-minimize-url \
--stdlayout -authors-file=authors.txt --include-paths="dir1|dir2" \
&lt;svn-repo&gt; &lt;git-repo-name&gt;
</code></pre></div>        </div>
        <p>Above I’ve done an OR filter that’ll include both <code class="language-plaintext highlighter-rouge">dir1</code> and <code class="language-plaintext highlighter-rouge">dir2</code>. You can use include/exclude with non-standard layout as well.</p>
      </li>
    </ul>
  </li>
  <li>
    <p><strong>Clean the Git repository</strong></p>

    <p>This basically consists of converting the weird remote references that <code class="language-plaintext highlighter-rouge">git svn</code> sets up to local branches and tags. The Atlassian migration scripts do a decent job at this but make some assumptions that may not work for you. First, to check what remote references have been set up, run the following command:</p>

    <p><code class="language-plaintext highlighter-rouge">$ git branch -a</code></p>

    <p>For me, I only wanted to migrate the <code class="language-plaintext highlighter-rouge">trunk</code> and thus simply deleted the remote references without converting them to local branches by using the following command:</p>

    <p><code class="language-plaintext highlighter-rouge">$ rm -Rf .git/refs/remotes/origin</code></p>

    <p>Run the <code class="language-plaintext highlighter-rouge">git branch -a</code> to verify that the references are indeed gone. If they still linger, then they exist in the <code class="language-plaintext highlighter-rouge">.git/packed-refs</code> file. Simply edit the file and delete the unwanted lines. You can read all about <code class="language-plaintext highlighter-rouge">packed-refs</code> <a href="https://git-scm.com/docs/git-pack-refs">here</a>.</p>
  </li>
  <li>
    <p><strong>Push to the Git server</strong></p>

    <p>This consists of 2 steps, adding a Git remote and pushing to it.</p>

    <div class="language-plaintext highlighter-rouge"><div class="highlight"><pre class="highlight"><code>$ git remote add origin git@my-git-server:myrepository.git
$ git push origin --all
$ git push origin --tags
</code></pre></div>    </div>
  </li>
  <li>
    <p><strong>SVN sync until cutover</strong></p>

    <p>The Atlassian guide talks about a 2-way sync, meaning people can work in SVN and Git, and your local migration repo can be synchronized with both. Unless you’re paid by the hour, I don’t recommend it. The best case scenario is a big bang cutover; if that’s not possible, you can have people continue committing to SVN and sync your local with it. The Atlassian migration scripts have a <code class="language-plaintext highlighter-rouge">sync-rebase</code> option that can do this.</p>

    <p class="notice--warning">For non-standard layout, The Atlassian migration scripts only work if you’d used the <code class="language-plaintext highlighter-rouge">--prefix=''</code> option during cloning as I’d described earlier.</p>
  </li>
</ol>]]></content><author><name>Abhijit Sarkar</name><email>contact@asarkar.com</email></author><category term="Technical" /><category term="technical" /><category term="subversion" /><category term="version-control" /><category term="git" /><summary type="html"><![CDATA[Migrating from Subversion to Git.]]></summary></entry><entry><title type="html">Brave Girls Don’t Cry</title><link href="https://blogs.asarkar.com/social/brave-girls-dont-cry/" rel="alternate" type="text/html" title="Brave Girls Don’t Cry" /><published>2016-09-25T00:00:00+00:00</published><updated>2016-09-25T00:00:00+00:00</updated><id>https://blogs.asarkar.com/social/brave-girls-dont-cry</id><content type="html" xml:base="https://blogs.asarkar.com/social/brave-girls-dont-cry/"><![CDATA[<p>I think we’ll all agree that it is rare that a television program moves us anymore. In the age of HDTVs, when channel surfing is made possible by touch less hand gestures and mere voice commands, we look but don’t see, hear but don’t listen, and then, with utmost indifference, we change on to a different channel.</p>

<p>That’s not the case though when you’re watching CNN Heroes. It is an <em>“annual television special created by CNN to honor individuals who make extraordinary contributions to humanitarian aid and make a real difference in their communities”</em>.
Each year, millions of people who watch this program are humbled by 10 individuals, who literally, have set out to change the World. They clean up rivers, help children who are fighting cancer, bring health care to some of the darkest parts of the world and so much more.</p>

<p>Make no mistake, on social media, I’ve come across men and women who are appalled by the state of things, and want to bring change. They are well educated, quote from famous poems and prominent literary works, stir up fierce debates, even attack you if you dare say something against their opinion. Unfortunately, that’s as far as their enthusiasm mostly go. How many times have you seen a Facebook post regarding the safety of women in India? Now think, how many times has the poster (or sharer) done something to change that state of affairs? Does that include the writer of this note as well? Yes, sometimes, it shamefully does.</p>

<p>That’s not the case though with Kakenya Ntaiya, a Kenyan women from the Maasai tribe. In her village, it’s customary for girls to undergo Female Genital Mutilation (a.k.a. FGM), where an elderly woman carrying a rusty knife would grab their intimate body parts and, in just moments, cut them out! If that’s not horrific enough, consider this: This ceremony sometimes happens as early as at the age of 10 and in front of hundreds of onlookers! Soon after, the girls are married off. In Ntaiya’s words:</p>

<blockquote>
  <p>It means the end of their dreams of whatever they want to become in life.</p>
</blockquote>

<p>When Ntaiya came to age, she took her stand; she’d go through FGM only if her father let her continue her education. From there, she went on to go to college in United States, a first from her village. Not forgetting her roots, and wanting to <em>“help (my) sisters”</em>, she returned to her village in 2009 and opened a school for girls where today, more than 150 girls receive the education and opportunities that she had to sacrifice so much to attain.</p>

<p>When asked if she cried during the shocking ceremony, she told CNN:</p>

<blockquote>
  <p>Brave girls don’t cry.</p>
</blockquote>

<p>They sure don’t, Ntaiya, they sure don’t.</p>]]></content><author><name>Abhijit Sarkar</name><email>contact@asarkar.com</email></author><category term="Social" /><category term="social" /><category term="cnn-hero" /><category term="female-genital-mutilation" /><category term="humanitarian" /><category term="maasai" /><category term="kenya" /><summary type="html"><![CDATA[About Kakenya Ntaiya, the CNN Hero who is empowering Maasai women in Kenya.]]></summary></entry></feed>